Hello Everybody
The winner of this week's randomly drawn $50.00 Simon Says Stamp Gift Voucher is
45 Dori
Congratulations Dori ... Please claim your prize within the next two weeks by emailing Linda with your details so we can arrange for you to start buying yummy goodies!
Now for the next bit ... every week the entire Design Team nominate their favourites and the three pieces of art work with the most votes gets a fabulous blinkie! This week the winners that have been selected to join the elite club of vintage artists that can proudly display our top three blinkie are ...
5 Stampersuzz
9 Gillian
75 Tracy Evans
Congratulations to each of you ... your work was beautiful :0) Please email Linda and she will send you the Top 3 Blinkie! Thank you to everyone that took part last week. Don't forget to check out this week's Challenge ... we want to see anything ... and another $50 Simon Says Stamp voucher to give away!
Finally ... just time to say ...we are working through all the delicious applications for the Design Team and are on target to make the announcement shortly.

Wednesday, July 27, 2011
Monday, July 25, 2011
Simon Says Stamp and Show Anything Goes!
Hello again everyone! Thank you for playing along with last week's challenge ... the winners will be announced this Wednesday .... so don't forget to check back ... this could be your winning week!
We have had an amazing response to the Design Team Call ... I shall be working my way through your emails in the coming few days and hope to announce the successful applicants next Monday. Good Luck everyone!
This week Simon Says Stamp and Show ... Anything goes! If you want to join in the fun ... all you need to do is ... create something that ties in with our theme ... pop it on your blog ... and come back here and link up so everyone can see what you made! Before you start take a look at what the Design Team came up with...
 Nancy's last contribution as a DT member is a Crafty Secrets 3D Portrait Shadowbox Frame, using papers from Tim Holtz's Crowded Attic Paper Pad. Wendy Vecchi's dots from Seriously Art were used to add interest to the frames, Tim Holtz's Artful Flight birdcage & Haberdashery's dress form stamps were used for each of the side panels - and Nancy's fav die cut from Tim Holtz's Sewing Room took center stage. We are soooo going to miss your inspiration Nancy.

Using Sarah's inspiration piece from her July My Mojo Monthly, Linda created something similar but in her own style. The die cut squares were covered with Tim Holtz Vintage Shabby Paper Stash and stamped with images from the Mini Classic and Haberdashery stamp sets. Alternating squares were covered with Kraft Glassine paper that was embossed with the Tim Holtz Bingo Texture Fade. A crinoline flower was made using the Tim Holtz Tattered Florals die.


Since this is Lori's last project as a member of the team, she chose to stick with what she loves...Studio 490 stamps and Art Parts! She used stamps from Visions of Art, and Art is Therapeutic, and the leaf vine from the Art Parts - Leaves, to alter this 4 x 4 canvas. She also used Peeled Paint and Fired Brick Distress Stains, along with Peeled Paint Crackle Paint. And how about some Turquoise Perfectly Pearled pine cones to complete the nature theme? We are soooo going to miss Lori's quirky style!


 Please stop by The Design Team's individual blogs for more detailed pictures and further information on their work...Just click on their names! We are looking forward to seeing your interpretation of this theme! Our wonderful site sponsor Simon Says Stamp is once again giving away a $50 gift voucher!
 The prize will go to a random entry chosen by Random Generator. The challenge will close at Midnight Eastern time on Sunday 31st July 2011 and the winner will be announced during the following week. To qualify all you need to do is create a new piece of work ... post it on your blog ... with a link to this site and then pop a link below so everyone can come see what you made!
Have Fun!
We have had an amazing response to the Design Team Call ... I shall be working my way through your emails in the coming few days and hope to announce the successful applicants next Monday. Good Luck everyone!
This week Simon Says Stamp and Show ... Anything goes! If you want to join in the fun ... all you need to do is ... create something that ties in with our theme ... pop it on your blog ... and come back here and link up so everyone can see what you made! Before you start take a look at what the Design Team came up with...
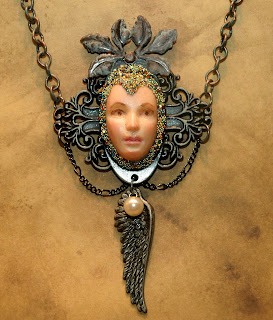
Candy really went out of her comfort zone for this "anything goes" piece! This is an intricate pendant she created using a Tim Holtz Ornate Plate, a face mold she had and Clear UTEE lightly sprinkled with a light pink Embossing Powder to create a flesh tone. The face is then colored with combinations of Perfect Pearls followed by Paint Dabbers. Juniper paint was finger brushed onto the Ornate Plate and the added Ideaology pieces to give a patina appearance.


Using Sarah's inspiration piece from her July My Mojo Monthly, Linda created something similar but in her own style. The die cut squares were covered with Tim Holtz Vintage Shabby Paper Stash and stamped with images from the Mini Classic and Haberdashery stamp sets. Alternating squares were covered with Kraft Glassine paper that was embossed with the Tim Holtz Bingo Texture Fade. A crinoline flower was made using the Tim Holtz Tattered Florals die.

This is a Grandmother's book Nancy created for her sis-in-law who's waiting for Grandbaby #5. Using a Maya Road Lunch Tin Album, she covered the chipboard pages with various papers from Crate Paper, Cosmo Cricket and October Afternoon. The decorating was finished using Maya Road Bingo Chips, a Tim Holtz Hitch Fastener, a Swivel Clasp, Pink Paislee Daily Junque stamps and miscellaneous baby charms.
Since this is Lori's last project as a member of the team, she chose to stick with what she loves...Studio 490 stamps and Art Parts! She used stamps from Visions of Art, and Art is Therapeutic, and the leaf vine from the Art Parts - Leaves, to alter this 4 x 4 canvas. She also used Peeled Paint and Fired Brick Distress Stains, along with Peeled Paint Crackle Paint. And how about some Turquoise Perfectly Pearled pine cones to complete the nature theme? We are soooo going to miss Lori's quirky style!

Lynne decided to use a project she created at CHA for the base of her project. She then augmented it with lots of goodness......flowers diecut with the wonderful Tattered Floral die and colored with painted on Distress Stain and Distress Reinker mixtures. She used one of Wendy's Art Part Leaves which she painted and stamped on. See the tissue tape she used to accent the "GIRL's" wonderful hat, along with the little Bauble. All the goodness was adhere using Multi Medium!!!

A Love Like That... Sarah thought we might all enjoy a boost from a riot of colour, flora and inspirational words on her altered painted apron. She first made an apron from Artist's canvas and coloured it using Claudine Hellmuth's Paints. Sarah then used Sticky-Back canvas, Wendy Vecchi stamps and butterflies and embroidery.

Christmas in July...Terry decided to make a Christmas Candybox. She used the fabulous NEW Tim Holtz Christmas Memories Stampset, coloured the box with Stormy Sky, Faded Jeans and Vintage Photo for all the borders. The stars are worked on with the Crackle Accents and on the other side of the Candybox she placed the fabulous Tim Holtz Odds and Ends Christmas Sentiment, which was embossed with Holographic Embossing Powder.

Kim's final project as member of this Awesome Team was inspired from Steampunk Debutante. Kim had the idea to create a steampunk top hat, using grungepaper, texture fade, cafe perfect pearls and gears. The Small easel is the base for the hat stand adhered to a large fragment, adorned with Art Parts and memo pin embellishments, one dangly using Steampunk gears stamp. Kim cut flowers Tattered florals and 3D flowers from grunge paper and the colours were matched using distress inks. We are soooo going to miss Kim's unique project ideas.

Dan was asked to make a "sparse and graphic" card by a friend. This is what he came up with, and they loved it, so everyone was happy :) Products used include the Rockstar and From The Heart stamp sets, and Distress inks in Frayed Burlap, Barn Door and Wild Honey.
I went for a three frame hangy thing this week. I covered the frames with embossed card created with Tim Holtz's embossing folders which I had coloured with Adirondack Colour washes; making the design 'pop' wih Vintage Photo Distress Ink. The face stamp is from Wendy Vecchi's It's Face Art.

Have Fun!
Wednesday, July 20, 2011
Winners-Day!
Hello One Hello All!!!
The winner of this week's randomly drawn $50.00 Simon Says Stamp Gift Voucher is
65 Lisa Our2AngelsinHeaven
Congratulations Lisa ... Please claim your prize within the next two weeks by emailing Linda with your details so we can arrange for you to start buying yummy goodies!
Now for the next bit ... every week the entire Design Team nominate their favourites and the three pieces of art work with the most votes gets a fabulous blinkie! This week the winners that have been selected to join the elite club of vintage artists that can proudly display our top three blinkie are ...
73 Ellen Vargo (2)
82 Kaz
114 Kelly O
Congratulations to each of you ... your work was sew Fabulous :0) Please email Linda and she will send you the Top 3 Blinkie! Thank you to everyone that took part last week. Don't forget to check out this week's Challenge ... we want to see your Embossing ... and we have a Design Team Call in addition to another $50 Simon Says Stamp voucher to give away!
Monday, July 18, 2011
Simon Says Stamp and Show Some Embossing, a Sad Goodbye and a Design Team Call!
Hello again everyone! Thank you for playing along with last week's challenge ... the winners will be announced this Wednesday .... so don't forget to check back ... this could be your winning week!
Before I set out the details for this week's challenge I have some sad news to share with you all. After spending the most amazing year on the Design Team with Kim, Lori and Nancy ... we have to say goodbye. All three ladies are leaving the Design Team to spend more time on other things ... we are going to miss them and I am sad to say that next week will be the last time we will get to see their amazing creations here on the challenge blog. Of course you can still check out their talent on their own blogs. I am sure you will all join me, the Design Team and the entire Simon Says Stamp family by saying a huge THANK YOU and wishing them the best of everything in all that they do! We are soooooo gonna miss you guys!
This week Simon Says Stamp and Show ... Some Embossing! If you want to join in the fun ... all you need to do is ... create something that ties in with our theme ... pop it on your blog ... and come back here and link up so everyone can see what you made! Before you start take a look at what the Design Team came up with...


 Sarah Engels-Greer


![]() Linda loves all embossing and enjoyed playing around with both heat and dry embossing. The heat embossing around the outer edge was done with clear UTEE with a little gold EP mixed in. She also used clear UTEE around the horse and rider image. She dry embossed a die cut Foil Tape Sheet. The two stamp sets used here are Tim Holtz Wild West and Artistic Outpost Ephemera Backgrounds.
Linda loves all embossing and enjoyed playing around with both heat and dry embossing. The heat embossing around the outer edge was done with clear UTEE with a little gold EP mixed in. She also used clear UTEE around the horse and rider image. She dry embossed a die cut Foil Tape Sheet. The two stamp sets used here are Tim Holtz Wild West and Artistic Outpost Ephemera Backgrounds.
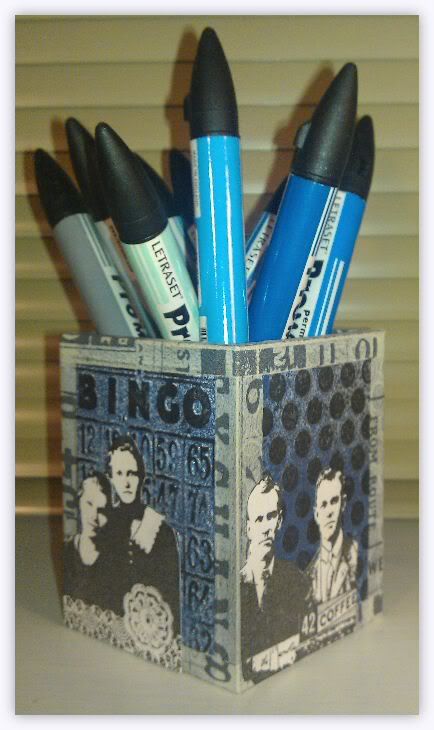
 This is the first of a set of colour-themed boxes Dan is making to store his Promarkers. The main panels were textured with embossing folders and then spritzed with Denim Colorwash spray and Heirloom Gold Perfect Pearls Mist. It was edged with tissue tape and images from the Artistic Outpost Generation Redux plate were added.

![]() Please stop by The Design Team's individual blogs for more detailed pictures and further information on their work...Just click on their names! We are looking forward to seeing your interpretation of this theme! Our wonderful site sponsor Simon Says Stamp is once again giving away a $50 gift voucher!
Please stop by The Design Team's individual blogs for more detailed pictures and further information on their work...Just click on their names! We are looking forward to seeing your interpretation of this theme! Our wonderful site sponsor Simon Says Stamp is once again giving away a $50 gift voucher!
The prize will go to a random entry chosen by Random Generator. The challenge will close at Midnight Eastern time on Sunday 24th July 2011 and the winner will be announced during the following week. To qualify all you need to do is create a new piece of work ... post it on your blog ... with a link to this site and then pop a link below so everyone can come see what you made!
**Design Team Call**
Good Luck with your applications everyone and have fun with this week's challenge!
Before I set out the details for this week's challenge I have some sad news to share with you all. After spending the most amazing year on the Design Team with Kim, Lori and Nancy ... we have to say goodbye. All three ladies are leaving the Design Team to spend more time on other things ... we are going to miss them and I am sad to say that next week will be the last time we will get to see their amazing creations here on the challenge blog. Of course you can still check out their talent on their own blogs. I am sure you will all join me, the Design Team and the entire Simon Says Stamp family by saying a huge THANK YOU and wishing them the best of everything in all that they do! We are soooooo gonna miss you guys!
This week Simon Says Stamp and Show ... Some Embossing! If you want to join in the fun ... all you need to do is ... create something that ties in with our theme ... pop it on your blog ... and come back here and link up so everyone can see what you made! Before you start take a look at what the Design Team came up with...
Nancy used both heat and dry embossing on her project this week. First, using a Big Shot Nancy dry embossed a Tim Holtz Glassine Pocket Envelope with a Texture Fades Embossing Folder. A tag was stamped and heat embossed (Distress Embossing Ink + embossing powder) using Tim Holtz Papillon stamps. Ribbon and more ink finished off the tag.
Candy decided to both dry and heat emboss on something she's not made before...a chunky ATC card. The pattern originated from Tim Holtz' ATC and Corners Die Cut. Each side has an embossing technique using Tim Holtz Stamps Sets, Tim Holtz Texture Fades and Ranger Embossing Powders. Then she embellished every side with Tim Holtz Ideaology and other finishing pieces.

Lynne began with a piece of Distress Cardstock which she then embossed it, sanded it, applied Tissue Tape, she then colored it with Distress Stain, brushed on some Perfect Pearls and finished off the card face with some drybrushed paint.

A lack of summer sun inspired a darker mood in Sarah's inky world... and her multi-layered Curiosity canvas of fabrics, wire, papers and ephemera. Sarah created a cracked glass tag with lots of UTEE and Tim's Haberdashery stamps. She also indulged in Distress inks, Color Wash, stitched Kraft Glassine Paper, Idea- ology and lots more!

Nancy Crissinger
A friend shared a different card fold with Nancy recently - and she just had to try it! When she saw this cloud-print Fine & Dandy paper from My Mind's Eye, everything started coming together for this week's challenge. Nancy wanted Tim Holtz's Umbrella Man to be the focus on her card, so she used Ranger's Embossing Ink with Tim's Vintage Photo Distress Powder to stamp Mr. Umbrella - heating it with the Ranger Heat-It tool.


Lori chose to go a little steampunk this week! She incorporated stamps from Steampunk, using clear embossing powder to create a resist from the images. Some gears created using the mini mover and shaper gadget gears add to the industrial feel, as do the Idea-ology sprockets and gears, and 7 Gypsies Steampunk rubbings!

This time Terry decided to make a card for a man...and what better way to start the card with Tim Holtz The Journey clearstamps. She embossed the car, the clock and the arrows with copic embossing powder. The background is embossed with Distressed Stripes. Everything is distressed with Vintage Photo, Weathered Wood, Faded Jeans and Stormy Sky.


Kim has incorporated both heat embossing and dry embossing! The cover to her mini sketch book has been doubled distressed using victorian velvet, aged mahogany, walnut stain and black soot distress inks. The leaf art part has distress stain and clear embossing powder. Then inked tabs along the edge using inspirational words.

My canvas this week shows lots of metal embossing. I used both Ten Second Studio moulds; metal and one of Tim's embossing folders to create the design. I LOVE the bird cage and to add some contrast I used the Tattered Florals Die to cut some old book pages to create some flowers for the leaves that were stamped using Wendy Vecchi's leaf stamp.

**Design Team Call**
Okay then ... Do you want to be part of this hot Challenge Blog?
We are looking for some more fabulously talented designers to join us and inspire folks to be part of our weekly challenges.
We ask that you be an active blogger and be willing to commit to creating art for each week's challenge and post it on your blog. We are asking for a 6 month commitment with possibility of extension. You will be responsible for actively joining our team in visiting our participants' blogs.
In return, we will offer you a Design Team pack every 6 weeks. You will also receive a DT discount on all of your purchases from the Simon Says Stamp store. You, your work, and your blog will receive a tremendous amount of exposure! Lots more fun goodies may be in store for you too!
TO APPLY, Please email the following to me, Linda Elbourne with the statement SSS DT SUBMISSION in the subject line.
The DEADLINE for applications is Sunday, July 24th, 2011.
Name
Address
Email
Blog URL/ Website URL
What message boards or craft sites are you active on?
What Social Networking sites do you use regularly?
What Social Networking sites do you use regularly?
What other Design Teams are you on right now?
What Design Teams have you been on in the past?
Write a few sentences about your style of crafting...
Please enter this week's challenge and email photos of your entry and at least 2 more of your projects.
Explain in a few sentences why you wish to be considered as part of this Design Team, and what you think you can contribute...
Good Luck with your applications everyone and have fun with this week's challenge!
Wednesday, July 13, 2011
Winners-Day!
Happy Wednesday everyone!!!
The winner of this week's randomly drawn $50.00 Simon Says Stamp Gift Voucher is
57 Heaney
Congratulations Heaney ... Please claim your prize within the next two weeks by emailing Linda with your details so we can arrange for you to start buying yummy goodies!
Now for the next bit ... every week the entire Design Team nominate their favourites and the three pieces of art work with the most votes gets a fabulous blinkie! This week the winners that have been selected to join the elite club of vintage artists that can proudly display our top three blinkie are ...
3 Ellen
60 Hels Sheridan
93 Kaz
Congratulations to each of you ... your work was inspirational! Please email Linda and she will send you the Top 3 Blinkie! Thank you to everyone that took part last week. Don't forget to check out this week's Challenge ... we want to see your Stitches... we have another $50 Simon Says Stamp voucher to give away!
Monday, July 11, 2011
Simon Says Stamp and Show Some Stitching - Faux or Otherwise!
Hello again everyone! Thank you for playing along with last week's challenge ... the winners will be announced this Wednesday .... so don't forget to check back ... this could be your winning week! This week Simon Says Stamp and Show ... Some Stitching Faux or otherwise! If you want to join in the fun ... all you need to do is ... create something that ties in with our theme ... pop it on your blog ... and come back here and link up so everyone can see what you made! Before you start take a look at what the Design Team came up with...
Nancy Crissinger

Candy Colwell


![]()

![]() The prize will go to a random entry chosen by Random Generator. The challenge will close at Midnight Eastern time on Sunday 17th July 2011 and the winner will be announced during the following week. To qualify all you need to do is create a new piece of work ... post it on your blog ... with a link to this site and then pop a link below so everyone can come see what you made!
The prize will go to a random entry chosen by Random Generator. The challenge will close at Midnight Eastern time on Sunday 17th July 2011 and the winner will be announced during the following week. To qualify all you need to do is create a new piece of work ... post it on your blog ... with a link to this site and then pop a link below so everyone can come see what you made!
Have Fun!
Those are the usual tools for stitching, right? Nancy did use them to create the seam binding ribbon ruffle on her card, but also used an atYouSpica marker to give the look of stitching around the images. That covers this week's challenge, right? More details can be found on her blog.

Candy Colwell
Candy's "Patchwork Pandemonium" is a technique rich conglomeration of Grungeboard squares and rectangles. Some are embossed using Tim Holtz' Texture Fades. Some are left plain so that they can be stamped on and colorized with Distress Stains, Paint Dabbers, Alcohol Inks, Perfect Pearls Mists, Distress Crackle Paints or covered with Tissue Tape. They all work together to create a lovely 12x12 background that is embellished with Tim Holtz' Ideaology and STITCHING!!!

Lynne's "stitched" piece began with some Art Parts, painted with a mixture of Studio Acrylic Paints and stamped with Sepia Archival and a way coool stamp!! The wings were cut from Grungeboard and embossed. She painted the wings, sanded them with a sanding block, then applied ink with an Ink Blending tool. She added a crinoline flower as a finishing touch!!

Lori went with some ATC's this week....one in a Holtz style, and one in a Studio 490 Style! Both have backgrounds made from muslin colored with Ranger Colorwash or Distress Stains. She stitched some vintage lace on the flower ATC, and the flower was stamped using the Art in Bloom set. The "Love" ATC has a grungeboard heart cut using the mini gadget hearts die, some filmstrip ribbon, and a pen nib!

Nancy appreciates actual stitching but can't properly thread her sewing machine. So instead, faux stitching was done on this card with the help of a piercer and a Sakura black glaze pen. To the cardfront Nancy added papers from October Afternoon Five & Dime and Glitz Laced With Grace and then topped it off with a flower stamp from Inkadinkado.
Kim indulged her love of sewing for this challenge, creating a very aged looking bunny. To start, the bunny's muslin fabric was stained with antique linen and vintage photo distress stains. Kim definitely needed her scrubbie after that! The ear lining and outfit are stamped with Wendy Vecchi's fabulous ticking and check background stamps, using distress ink directly onto the fabric. The front she has stamped this wonderful flower and finished off with some poppers.

Glam up your Grunge with a clutch bag for your tools and Art journal cover! Sarah made Distress Stain splats and stamped with Urban Chic onto Retro Grunge paper before covering in plastic to create a 'sewable' and splodge-proof product. All edges are distressed and inked with Fired Brick and finished with ribbon, string and Idea-ology.

Terry made a HUGE tag.....with lots of Stiches, or are they faux stiches?? She used Alterations, Pattern and Stiches Set and distress inks Rusty Hinge, Vintage Photo, Forest Moss and Pumice Stone. The little embellies are from Maya Road Sew Cute Mini Chipboard Set, worked on with embossing powder. The background paper is from Graphic 45, Steampunk Debutante, The flower is made with the Tattered Floral Die and a pearl and spacer. The border uses the Punch from Martha Stewart.

The Huck Finn set from Artistic Outpost is Linda's latest stamp acquisition and she thoroughly enjoyed creating a bit of refrigerator magnet art with it. She started with a 6x6' piece of chipboard and a #8 manilla tag to build a little collage on. She did lots of stamping with Ranger Black Archival Ink and Brushed Corduroy Distress Ink. A bit of Kraft Glassine paper and a few Tim Holtz metals finished off her work.

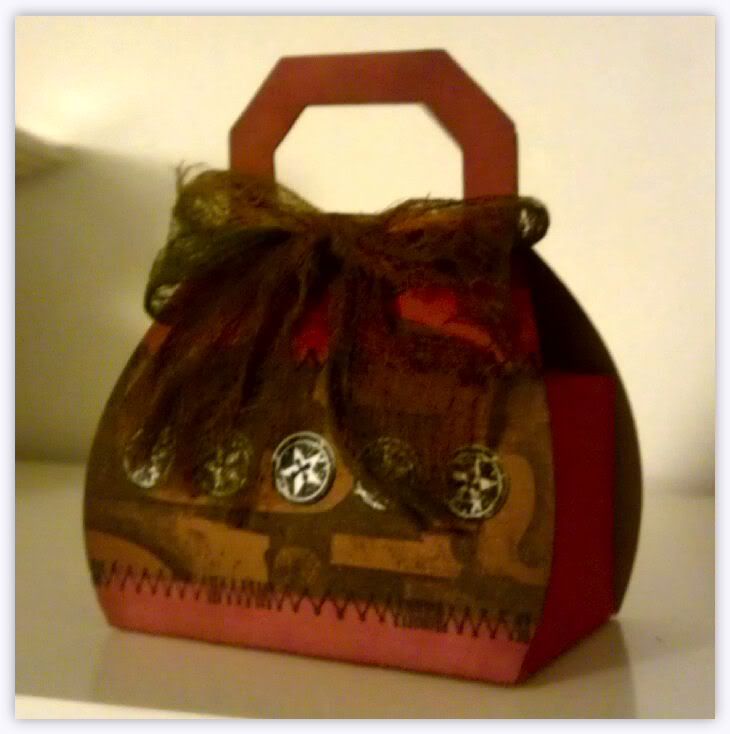
Dan started by cutting this cute purse-shaped favor box from kraft cardstock. The central panel was coloured with Rusty Hinge Distress ink and stamped using "The Countdown" stamp set. The faux stitching is from the "Spring Sprung" set and the buttons are from the "Bitty Grunge" set. He used ColorWash sprays to dye a piece of cheesecloth, which he then used to tie a bow closure. Now all he needs is a cute gift to go inside it!
Like Nancy W I can't thread my sewing machine either ... it's only about 100 years old ... I am obviously a slow learner! On my card I used lots of THE Wendy Vecchi stamps; Ranger Distress and Archival Inks; An Idea-ology Ornate plate and my usual sewing equipment which consists of a Tim Holtz Rule; a Tonic Craft Pick and a Black Sakura Gel Pen.

Please stop by The Design Team's individual blogs for more detailed pictures and further information on their work...Just click on their names! We are looking forward to seeing your interpretation of this theme! Our wonderful site sponsor Simon Says Stamp is once again giving away a $50 gift voucher!
Have Fun!
Subscribe to:
Posts (Atom)