Monday, February 25, 2013

Challenge: the stamp you love (but don't use)...

Any stamper has at least one, the stamp that they love but don’t use. Or, it could be a stamp you haven’t used, don’t know what to use it on, or otherwise aren’t really using. Maybe it’s brand new, maybe it is years old. The challenge this week is to grab that stamp, and use it some way on a project.


Background stamps make frequent appearances on Ashli's projects. But, she has a whole collection of other stamps that are usually quite neglected that she put to use this week.
Stamps are so much fun, aren't they? They are also fun to buy, collect, hoard... and forget about! I often forget about the fabulous little sets I pick up here and there. For this layout, I grabbed some Amy Tangerine Ready Set Go papers and some of her fabulous stamp sets. That little house has to be one of my favorite images. A little embossing, lots of inking and some punching later and I have a page full of stamped up goodness.


Trace has quite a few stamps that need to be inked for the first time, this is one of them.
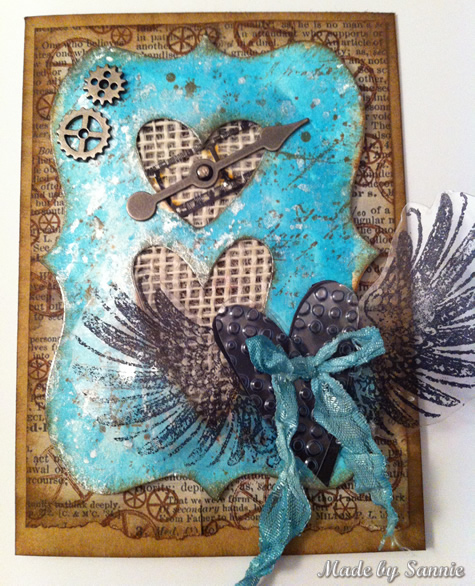
I admit it- I am guilty of stamp neglect. This little pretty stamp from Hero Arts called Starbursts had been sitting around on my shelve for about a year! I wanted a cool background to showcase it off, so I choose a fun technique from the Tim Holtz book: A Compendium of Curiosities Vol 1, and used about six different blues and greens from the Ranger line of Alcohol Inks. This neglected stamp was paired with two other Hero Arts stamps I use ALL the time; Envelope Pattern for the background, and Year Round Sentiments.
Candy is so excited about a new stamp set she has had for a couple of months but has not used yet. This is her perfect opportunity to share it with you.
This is a recent purchase of Darkroom Door's "Fun and Games" that I've not had the time to play with until now. I LOVE this entire set! But after I'd stamped every thing out using Jet Black and Vermillion Archival Inks, I struggled with what to put them on. Finally I decided on a 5x7 canvas covered with 7 Gypsies Life Tissue Paper and washed with Studio Classic Teal and Sable Brown. Wendy Vecchi's Studio 490 Embossing Paste and Brick Wall Stencil came to the rescue when I had a big bare spot in my design.


Tracy decided to create a quirky card this week using the Hero Arts Birds and Branches stamp.
I spent quite a while looking through my cupboards at stamps I have never used and to be honest I was quite embarrassed and have now decided to put that right beginning with this challenge. 2013 will be the year I use all those neglected stamps! Simon Says Stamp Large Heart Craft Die came to my rescue for my background, spritzed with postbox red Dylusions ink spray adding sea salt into the mix for added interest along with vibrant turquoise to add a second pop of colour. I don't think this bird will be neglected in the future!


There are few stamps in Sandra Mouwen's stash that she really loves and has never used, because she loves to use them as soon as she gets them.
It was difficult to find a stamp I didn't use yet and really love. But I did manage to find two of them that are perfect for this project. The first one on the bottom is from Tim Holtz Classic #6 collection and the second one is an exclusive stamp from Simon Says Stamp - You Can Do Anything set. Can't believe I haven't used them before! I used a #10 Manila Tag and spritzed the brilliant vibrant Dylusion Sprays Bubblegum Pink and Lemon Zest with the Mister Huey's Ampersand Mask as well as a lot of other creative play.

Anita loves all things inky, and stamps are no exception, especially the wood mounted versions.
While I have a few stamps I haven't used yet, one of my oldest wood mount is Tim's Best Friends image. I think this one is just so precious and innocent, and perfect for any project, but here I've used it for a card for my Godson. He and his wife just had a beautiful baby boy! I did tweak the image some. Can you guess how?


Anna-Karin loves stamps, especially rubber stamps, and there were quite a few that were eager to get inky:
I like house stamps a lot, and this Home Sweet Home set from Darkroom Door was still waiting to be inked up. Three houses were embossed on inky paper with Vintage Photo distress embossing powder and given tinned roofs and doors. They found their home on this Sizzix Caddy Bag, with a compartment on each side. It can be used to store, for example, pens or tags, or as a cute gift holder. The caddy was dressed with BasicGrey Serenade papers, more stamping, tattered banners and birds.

Suzz has a collection of bird stamps that she loves but don't get used enough.
I have so many beautiful bird stamps and they don't get used often enough. I decided to create a birdhouse with different rooms to showcase various birds that I have in my collection. The Stampendous Bird Post is one of my favorites and hadn't been inked up yet. I was happy to stamp him and put him in his own nest. I pulled out a couple of different houses for the birds as well with the lovely Stampendous Vintage Birdcage and the Hero Arts Tall Birdhouse. The birds even have their own portraits hanging in one of the rooms framed out in bezels.

Dan channelled memories of his childhood in the USA into his Americana triptych.
Being a Brit, as much as I love Tim's Americana Blueprint stamp set, it's not too surprising that so far it has sat in my craft room unused.  As a kid, growing up in IL and NJ, I can clearly remember 4th of July celebrations and pledging allegiance to the flag every day in school, so the call of this kind of Americana imagery is very strong within me.  It's a little early for 4th of July, but I can keep it in a safe place until then!  Other stamp sets I used included Remnants, Psychedelic Grunge, Odds and Ends and Road Trip.

Sarah loves wooden block stamps and this fabulous Mona Lisa image has been standing on her shelf, without ink for way too long.
With a face and stare like Mona Lisa you really don't want to take away from her beauty so I thought I would go for a touch of Andy Warhol colour and let Mona try out pop art! I picked my brightest Distress Inks to create my card using a sponged background and then a heavier block of colour for a dramatic effect. I just had to go for a few words, I always do, so I picked out four Chit Chat words to accompany this famous smile which could tell a thousand tales I'm sure.


Now it is your turn! Go grab a stamp you haven't been using (or one you just don't get out enough) and create something to share! Also, be sure to click on our design team's blog links so you can see more photos (and full supply lists) for their projects.

As always, Simon Says Stamp is giving away a $50 gift voucher that will go to a random entry chosen by Random Generator. To qualify all you need to do is create a new project that ties in (in any way!) with our theme and post it, along with a link back to this challenge, and add a link here. This challenge will end at 11:59pm on Sunday March 3rd EST.

For the full rules, read the "challenge rules" posted in the side-bar here on our blog.


Saturday, February 23, 2013

Winners: Something Messy

The 'messy' entries came pouring in, and we celebrate another fabulous week here at Simon Says Stamp and Show! I'd like to thank Simon Says Stamp for another great chance to win a $50 voucher!!

The lucky (randomly drawn) winner for the   challenge is...

129 Norma Gomez 

Please claim your prize within the next two weeks by emailing May and letting her know you won this challenge. Now let's talk about the top 3 projects as chosen by the Stamp & Show design team.  This week the honors go to:

 10 Ana K
36 Elly
51 Paula W

Be sure to visit their blogs and check out their amazing entries. So inspiring! Congratulations to each of you on a challenge well done! Please email May for the Top 3 Blinkie.
 
I'd like to thank everyone who took part in the challenge. It is always a joy to see what you create. I'd also like to say thank you again to Simon Says Stamp for their generosity - each week we give away a $50 gift voucher to the shop that you can use to buy all kinds of fabulous stamps, inks, and paper crafting supplies. Remember - you just need to enter the challenge each week to be entered into the drawing!

Wednesday, February 20, 2013

Tutorial by Janeen at SuburbNgypsy

Our fabulous guest Janeen at SuburbNgypsy is back today, and she is sharing a tutorial for the background of the beautiful Easter project she shared with us. Remember - this week's Metal-ology challenge is still open and details can be found here.

On to the fun!

Simon Says Stamp – Metal-ology Challenge
Designer: The Suburbngypsy
Project: Heavy Metal Easter


Tutorial: Turning paper into metal
I love this look of copper patina, and worked out this very simple technique to transform any chipboard or heavy paper into “copper”.

First I dabbed chipboard letters with my copper Acrylic Paint Dabber, being sure to leave chipboard exposed. It’s really important to leave some areas clear of the paint because….
After the paint dried I spritzed the letters with Turquoise Blue Glimmer Mist. All of the unpainted areas now turned blue-green, like the copper patina. The blue-green color also layers over the copper, dulling it just a touch to antique it.
Turning metal into paper:
You can create great effects on embellished metal by using Distress Inks. For these panels, I first embossed metal sheets by using my Big Kick and an embossing folder from Tim Holtz’s Alterations. Next I covered them with a light coat of white acrylic and set aside to dry.
Once the paint was dry I did a little scuffing and sanding to expose a little of the metal. Then I used Walnut Stain and Tumbled Glass Distress Inks to tint the panels. I worked lightly, doing the Walnut first and letting it set for several minutes.

Then I pressed the Tumbled Glass ink pad directly onto the panels to add the blue tint, and smeared a bit with my finger tips for a more worn look.

I love how Janeen changed the look of products in her stash to create this beautiful project! For more photos of this project you can see Janeen's post on her blog here.

Bio of a Suburbngypsy
It all started long ago before there were scrapbook stores, crop circles, or the internet. Yes the gypsy is that old. I began making scrapbooks of my travels the old-fashioned way – sketch books filled with photos, keepsakes and journaling. Then the industry boomed and along with it the products! I jumped off the page and began altering objects, creating canvases and exploring 3D media, getting covered in ink and glitter in the process. Now 20 years later I teach classes, blog, and am thrilled to be a part of Authentique Paper’s Design Team. It’s been an awesome journey.
When I’m not covering myself with paint, I work full time in marketing (herding cats), chase my Girl Scout troop (more herding cats), wrangle my family (definitely herding cats) and try to walk our Saint Bernard, Loki (not a cat).

Monday, February 18, 2013

Challenge: Metal-ology

 
From foil to tin buttons, silver paint to gold leafing pens, metal brads to gold copper glitter or anything in between - this week the challenge is to incorporate some metal into your project. I (May) have rounded up my top 10 metallic products on my blog this week to inspire - and I'm sharing some past favorite projects and tutorials featuring metal goodness as well.
We're mixing it up even more this week though - as we also have a guest designer!

Janeen at SuburbNgypsy joins us today - and she has a fabulous tutorial that will be posting here on the challenge blog on Wednesday. Let's check out her creation, and what she has to say about it:
 I love topsy-turviness, so for the Metal Challenge I decided to play a little trick and make the metal look like paper, and the paper looks like metal. First I created the metal panels by embossing them in a Texture Fade embossing folder, then layering them with paint and Distress Inks. The result looks like Victorian patterned wallpaper – metal now looks like paper! I love the look of copper patina, and you can create a great effect by using a copper Acrylic Dabber and a little spritzy of Tattered Angels Turquoise Blue on any old chipboard letters. I love love love this effect and it’s so easy to do. Rounding out the piece are papers from Authentique and a good dose of trinkets from Tim Holtz.
 
 
Candy loves metal projects! Here she has combined her love of metal with her love of steampunk in this vintage style hot air balloon.
When I think of metal, I think of steampunk. When I think of steampunk, I always see hot air balloons. So, it seemed natural for me to create this vintage style metallic hot air balloon out of a styrofoam ball covered in Ranger's Metal Foil Strips that were distressed and made to look "soldered" using my Ten Seconds Studio's Cool Tools Micro Wheel. I love the added steampunk feeling Tim Holtz' Mini Gears give to the tethers of the balloon and to Wendy Vecchi's Gent's hat. So, fly high and ENJOY YOUR ARTISTIC JOURNEY!
 
 
Suzz was thinking about the golden touch and how she tends to add gold to many of her projects.
This project started with me playing with the Ranger Melt Pot. In the process of playing I turned into Midas and everything I touched was receiving a coat of Aged Gold Embossing Enamel.  My David even has a touch of gold in his eye.  The glint was provided by the Signo Uni-Ball Gold Pen and the Signo Uni-Ball White Gel Pen.  I had a fun afternoon playing with the mix of Bees Wax, gold and the melt pot. 

Anna-Karin had lots of fun making a tag with many different types of metals and techniques.
I love using metal on my projects, both real metal and techniques that produce faux-metal effects. Different grungeboard die cuts, foil tape, alcohol inks and paint were used to make the background of this tag. The wings were die cut from Clearly for Art Modeling Film, embossed in the coordinating folder, colored with Silver Alcohol Ink, shaped a bit and layered. The heart and arrow were covered with layers of UTEE and platinum embossing powder. I just had to use some metallic Idea-ology embellishments, and even my ribbon has a metallic shine, since it was dyed with Black Soot and Brushed Pewter Distress Stain.


Trace was inspired to make a "manly" card full of metal elements.
My hubby has been on my mind lately because his birthday is coming up. I decided to run with the metal theme and make a "manly" gushy card! I love the look of Rangers Metal Foil Tape Sheets over these chipboard letters, it was impossible to apply it perfectly; so it really works for a more manly card. I snuck down to hubby's work room, and found some washers to add to my Tim Holtz Mini Gears Sprockets. The perfect glue to adhere all these metal elements is my "go to" Glossy Accents- I put this stuff on and under everything!
 
Anita loves everything metal and tends to add a bit of it to most of her projects, but in this project she added quite a bit.
When I read what this challenge was to be I let out a squeal of delight! I use metal often, so I really wanted to challenge myself here by doing something I'd never done. I found inspiration from an antique trunk that belonged to my husband's grandfather, and from there I just developed 'metal madness' over a paper mache trunk.
The metal panels of the trunk as well as the roses may look difficult to make, but they are actually quite simple. I used Ranger's Metal Foil Tape Sheets and colored them with Alcohol Inks, along with accents of Pitch Black Paint Dabber. Wendy Vecchi's Clearly For Art helped me out with the roses. I just love the contrast of the thought of tender roses with tough metal!


Ashli  can't get enough of the gorgeous grays layered with pops of pink and teal in Glitz's Cashmere Dame Collection. And what goes perfect with gray? Silver metal, of course!
Glitz's Cashmere Dame has to be one of my recent faves! It really is the perfect collection to scrap this sweet photo of my daughter and combine it with touches of metal. To get my page started, I created my own embellishment using a Flower Bottle Cap, some of the aforementioned patterned paper, Glossy Accents, and Wooden Hearts. A final touch of some Ranger Metal Sheets tucked in the layers help to pull in my metal embellishment and add just the right touch of bling.

Tracy has set herself a personal challenge to use up all the
alterable items lying around her craft room and this bracket book cover
was crying out for a transformation.
Metal foil
is the first thing that comes to mind when I think of metal, I love the
texture, the flexibility and the Riveted Patchwork Technique from Tim's
Compendium Of Curiosities Volume ll
works fabulously in combination with the metal. I used hearts cut from
thick card using Wendy Vecchi's
Large Heart Stencil and Distress Stains mowed lawn and salty ocean, two favourites of mine at the moment. I used hearts from Simon Says Die and stamp set Plenty Of Hearts and Simon Says Mini Heart Set Craft Die. Now I think I have given this neglected piece some love, don't you?
 
Dan added some new life to a cheap, wooden frame.
So, there I was, in this great Swedish cafe I go to sometimes for meatballs, gravy and chips, and while I was there I picked up a bunch of these cheap, plain wooden frames. At the top of my staircase I have a little display of things I've made using Tim Holtz's David head stamp and it needed a little something extra to balance out the composition of elements so this metal covered frame came to the rescue. Decorating a frame is always a tricky proposition - you want it to look nice but at the same time you don't want it to draw attention away from the artwork it's framing. Hopefully I've pitched this one just about right. In addition to Tim's stamp, I used a range of Texture Fades and Embossing folders on the metal in conjunction with my Cuttlebug machine.

 
Sarah took rusty inspiration from an old tin lid to create her metal filled hanging.
I love working with metal and what better way to start than with an old tin lid which is the base for an ode to all things rusty! I knew I wanted to use Tim's Pocket Watch and a lavish spread of flowers and when I found this old tin lid, I knew it would be the perfect setting. I always seem to fall for these rusty tones of Alcohol Inks combined with Vintage Photo Distress powder as I love the aged effect it produces. The young lassie of the  Girls Rules stamp seemed destined to be the face of innocence among the faded butterflies and antique lace. Let your imagination take you on a journey into the wonder of metal.


Sandra Mouwen needed a place for storing her stencils and rub ons, so she made one with a bit of a metallic look.
I had all my rub ons and stencils together in a box, but it wasn't working for me. So I wanted to create the perfect storage for them. Since I had some foam board I decided to make it out of that. I painted all the pieces black with Studio Charcoal Black Paint, and to give it a bit of a metal feel I smeared some Pearl Paint Dabber on the edges. I knew I wanted to use Chipboard as dividers, and needed to find a way to make that work. A light bulb moment later I cut some Wonderful White Corrugated Cardstock to the sizes of the side pieces and painted it black also. I found out that Tacky Glue is an amazing substitution for hot glue to adhere foam board together.

 
Now it is your turn! For more inspiration be sure to click on our design team's blog links so you can see more photos (and full supply lists) for their projects. Then go grab some supplies and join us in this challenge!
 
As always, Simon Says Stamp is giving away a $50 gift voucher that will go to a random entry chosen by Random Generator. To qualify all you need to do is create a new project that ties in (in any way!) with our theme and post it, along with a link back to this challenge, and add a link here. This challenge will end at 11:59pm on Sunday February 24th EST.

For the full rules, read the "challenge rules" posted in the side-bar here on our blog.


Friday, February 15, 2013

Winners: Ever After Challenge

I'd like to thank Simon Says Stamp for another great chance to win a $50 voucher!!

The lucky (randomly drawn) winner for the   challenge is...

4 astrid 

Please claim your prize within the next two weeks by emailing May with your details. Now let's talk about the top 3 projects as chosen by the Stamp & Show design team. The entries were so fantastic - so many fairy tales, childhood stories, and other magical inspiration. Truly - it is a delight to see each and every entry and this week was no exception! This week the honors go to:

 1  butterfly
35  Nina (Ninel)
64 Chris Dark

Be sure to visit their blogs and check out their amazing entries. So inspiring! Congratulations to each of you on a challenge well done! Please email May for the Top 3 Blinkie.
 
I'd like to thank everyone who took part in the challenge. It is always a joy to see what you create. I'd also like to say thank you again to Simon Says Stamp for their generosity - each week we give away a $50 gift voucher to the shop that you can use to buy all kinds of fabulous stamps, inks, and paper crafting supplies. Remember - you just need to enter the challenge each week to be entered into the drawing!

Monday, February 11, 2013

Challenge: Something Messy

Whether distress stains or paint splatter, tearing up a sheet of paper or a layered collage, mist or a glitter burst - let’s get a bit messy this week! It is the first week of March, and they say this month starts like a lion right? So let’s roar and make some creative mess! OK, so you don’t have to stain your hands with Dylusions as I so often do, and you don’t have to make a messy looking project, but let's see where our design team takes the idea of 'messy' with this challenge.
 
 
Trace is trying a new kind of messy this week.
I am going to call it "pretty" messy, and I am starting with my first art journal. My goal with it is to be more free and messy and to just let art happen - not to think and stress so much about the project. I must confess, my Dylusions Creative Journal is so pretty that I just held it for a few week before I finally cut loose with my Dylusions Ink Sprays in Crushed Grape, London Blue , and Bubblegum PinkI had to pretty up the page a bit with my Dylusions Dotted Flowers Stencil and The Crafters Workshop Mini Zinnia Template. I really like how the White Gel Pen by Uni-ball just helps the colours to pop, and show off the "pretty" flowers.

Dan's messy piece has a colour story that was initially inspired by a fragment of cardstock.
This piece was a tricky so-and-so this week, but it was really my own fault. You know how, when you start doing something, you have it all planned out in your head, then you can't stop changing your mind once you've started? Well that's how I was with this. I had a small fragment of Retro Grunge card on my desk which I decided to use as my colour inspiration. My initial plan was to make this a celebration of Dina Wakley stamps, and you can see her Grungy Circles in the background of my composition. As I worked however, I kept seeing "Jake" staring at me and I finally gave up the Dina plan and made this a Jake-a-thon instead.

Sandra Mouwen is a very messy crafter, just ask her hands!
I really am the messy type of crafter. It doesn't necessarily mean all my projects are messy, it's that I make a mess crafting! Making this card was no exception. The paper in the back is a piece of Antique Book Paper - I love that it's so light weight. I stamped the edges with the Craftsman stamp and distressed it a bit with Walnut Stain Distress Ink. On top I've cut out the bigger Ornamental die and cut also out the Mini Hearts. Oh and of course my dear Mr. Scrubby is so nice to clean my inky fingers afterwards.

Tracy got in touch with her messy side to create and inky background to showcase her fabulous textural heart.
To say I created a mess for the love of my art this week is an understatement; my fingers were covered in ink and glue and so is my garden table! I sprayed my inks outside on my garden table so that I could go mad and spray to my heart's content, using vibrant turquoise and melted chocolateDylusions Spays. I added a little sea salt into the mix (if you are going to make a mess you may as well go the whole hog!) and after mopping up my mess I began again. This time with the textural heart cut from card using Wendy Vecchi's Stencils for Art Large Heart. It's so invigorating to just let loose now and then.

I (May) used water to make a bit of mess on my latest card.
This Tim Holtz Ruler background stamp is so cool all on its own, but I knew when I saw it that I wanted to use it with a homemade stencil to create this card from the heart. I used distress inks on this card intentionally because I knew that if I did, then misted with water it would react, bleed, and make a mess in the most wonderful way. Like many members of our design team - my fingers are more often an inky mess than not and I wouldn't have it any other way.


Ashli has a hard time NOT getting messy when she makes a project. So, to make this a challenge for herself, she decided to try using messy mediums in a clean way.
Oh yes, messy is what I love to do! But, this is supposed to be a challenge right? What better way to challenge myself this week than to use loads of messy mediums and attempt to make a "clean" project? I upcycled an old toy package as my foundation for this Valentine's Day home decor piece, but I do believe a Configurations Box would work quite nicely as well! I created my heart embellishments using some chip board, Glitz Cashmere Dame Patterned Paper, and some SticklesPink Paislee's Secret Crush Papers line the interior of my shadow box, while a good healthy sprinkling of Silver Glitter and Color Shine sprinkled about adds sparkle. Overall I do believe I was able to get a rather clean look with all of these messy mediums!

Candy had such fun playing and making a mess to create this 8x8 canvas.
This challenge is the perfect opportunity for me to keep a promise I made myself to not let the "fear factor" deter me from experimenting with different styles and products. This canvas is the result of a messy play session involving layers of Black and White Embossing Paste, Dylusions Sprays, Sunflower Sparkle Perfect Pearls Mist, Jet Black Archival Ink, Snow Cap Paint and paper. This art journal style canvas was so intimidating to me before I started it.  But, I dove in head first and I have to say that this form of self expressive art is something I definitely will do again. It's fun!


Anna-Karin loves to get messy and often walks around with blue or green hands, or, as in the case of this accordion card, pink hands, with a touch of Perfect Pearls.
For this project I got messy with my Dylusions mists, Perfect Pearls and of course some Distress Inks. Since it is Valentine's Day this week, I wanted to use my new Stamper's Anonymous Tim Holtz Valentine Blueprint stamps and decided to showcase them in Karen Burniston's fun Sizzix 3-D Flip Accordion Album. I used Crowded Attic patterned paper for the frame pieces and embellished my card with wood veneer hearts, arrows and people.


Anita loves to get her hands creatively dirty! You'll never find her sporting a manicure.
Have you ever regifted a gift? That is what this tag is all about, and I just couldn't help myself. I got plenty inky messy in the process of  getting this regifted tissue paper on this tag all ready to give away. A few of the roses were colored using Tim's new Distress Paint in Spun Sugar, as well as Dyan's new Dylusions Ink Spray in Funky Fuchsia.

Suzz heard the word messy and decided to get out the shaving cream and Dylusions Ink Spray and create some marble backgrounds that smell good.
My youngest daughter and I love this technique as it involves the shaving cream and blending different colors.  She loves smearing the shaving cream on and not knowing how it is going to look when you pull up the paper.  We created a variety of backgrounds and I picked out  this soft blue, yellow and gray background to create my triptych.  I decided to create a floral pattern across the the panels using the Stampendous Hollyhocks. The butterflies are one of my favorite stamps to use, and they are stamped in the same beautiful Aged Gold Embossing Enamel as the flowers.
 
Sarah spends lots of time getting messy everyday, but that tends to be nappies and baby mealtimes at the moment! So for once she was glad to go wild with all her craft table had to offer in a mixed media canvas.
It's been ages since I had time to play in my Art Journal so I decided to express myself on a chunky canvas instead. I didn't have any idea what I was going to create so I let myself be led by the many wonderful products around me and my feelings of the moment. I just love to work on building up layers of colour, ink, paint, paper and sprays. Adding, taking away, playing with translucent and opaque layers, letting the contrasts appear by chance. I used lots of Dylusions Inks, gesso, Wendy Vecchi stamps, touches of Tissue Tape to name but a few... This kind of messy was just what the crafty doctor ordered!

 
Be sure to click on our design team's blog links so you can learn more about how they love to get messy and see more photos (and full supply lists) for their projects. Then it is your turn! Play with inks, make a mess, or take this challenge (as always) in any direction that inspires you.
 
This week Simon Says Stamp is giving away a $50 gift voucher that will go to a random entry chosen by Random Generator. To qualify all you need to do is create a new project that ties in (in any way!) with our theme and post it, along with a link back to this challenge, and add a link here. This challenge will end at 11:59pm on Sunday February 17th EST.

For the full rules, read the "challenge rules" posted in the side-bar here on our blog.