Monday, January 28, 2013

Challenge: Seeing Stars

Stars are the inspiration this week - and you’re welcome to take this inspiration literally or you can instead focus on a ‘star’ supply that you couldn’t imagine crafting without! Some glitter that sparkles like a star could work, a punch, a sticker, some paper, or any way you so choose to interpret this challenge. Whether you’re inspired by the night sky, the sports all-star in your life, or the cute star stencil you just found - we can’t wait to see what shines in your project this week!

Suzz was thinking of stars when she spotted this image with her fancy star belt buckle.
This image reminds me of all the stories I heard about Annie Oakley as a child.  I decided to use the Bo Bunny Market  papers as there soft colors and patterns reminded me of the Old West.  I needed lots of stars and the Fiskars Hand punch and Spellbinders Die Stars   were the perfect tools to create them.  The card opens with a window that showcases my cowgirl star.

Lights, Camera, Action! Candy was seeing stars when she created this dimensional 6x6 board honoring that beautiful and famous Hollywood icon, Marilyn Monroe.
 Seeing stars.  The second I saw this theme, this is what popped into my head.  I love Marilyn Monroe and the marriage of Sizzix Bigs Stars and Marilyn captured on an Caramel and Ginger Alcohol Inked vellum film strip seemed like the perfect project!   Follow the filmstrip ribbon as it winds from the camera flash of Tim Holtz' Mini Vintage Camera through the stars and into the "film reel" made from Tim Holtz' Gadget Gears, Grungeboard, cardstock and Gold and Silver Paint Dabbers.  Marilyn sits atop the film reel, posing for her next photo shoot.


Sarah was really happy with this theme as she was looking for a chance to use one of her favourite Wendy stamps... This is one of four cards she created.

When I head for my craft room I always find the remnants from the previous projects upon my table... Maybe, like me, you also have some art journal pages that are "in the make" which is a good way of saying still unfinished! I was inspired by the scraps and journal pages before me and set about creating some recycled cards. As said I love my Wendy stars and I also wanted to try out my new Phlax Aplha stamps which were prefect for the wording. These cards have a bit of everything I love. Splodges of paint, ink, torn pages and stamping and a bit of Picked Raspberry Distress Ink is just what you need to brighten up a dull day!

Dan has made a book containing a favourite song and things to count for a friend's young child.
Stars are probably my favourite design element, I use them on everything and never get tired of them. I reigned back the starriness a little for this project - a counting/singing book for a friend's daughter. She's starting to learn numbers and letters so I thought I'd make her a book full of stars (and other shapes) to count and a song to sing. Of course, Twinkle, Twinkle, Little Star is sung to the same tune as the Alphabet Song, so it hopefully inspires her learning in more ways than one! I used Cavallini & Company Alphabet tape for the edges of the box and lined it with starry panels from the Retro Grunge paper stash. My trusty Bind-it-all machine made the whole thing possible, not to mention a selection of star brads and flower brads in a range of sizes and colours.


A vintage tag inspired by the Picture Star plate from Artistic Outpost was Tracy's interpretation of this weeks challenge.
Whenever I see a challenge for STARS I always seem to be drawn to old movies stars, like Fred Astaire and those wonderful leading ladies and the Picture Star plate depicts that perfectly for me. I am also drawn towards vintage tones when thinking of old movie stars created here using Brushed Corduroy and Walnut Stain Distress Inks. No movie star inspired tag would be complete without a touch of Film Strip Ribbon to add to that old style movie feeling. You really should take some time out and watch some of the old classics they are fantastic!


Trace combined her love for stars, and the love for her hubby; to come up with this tag.

My kinda ugly mop-up tag was the starting point for the manly tag I wanted to make :) The Crafters Workshop mini Star Shower template was the perfect tool to give the tag a subtle starry background. I first sponged Versamark through the stencil and then applied clear Hero Arts embossing powder. I need to remember to do this more often with my stencils!! To make the stars pop more, I added Tim Holtz Distress Ink Stains in colours Picket Fence and Tarnished Brass. For my awesome hubby I needed the perfect saying, and this one from Hero Arts clear stamp set Year Round Sentiments conveys exactly how I feel about him.

It's a wish upon a star that Sandra Mouwen's best friend got engaged.
I'm so happy that she is getting married! I wanted to make her this card, because she is a star to me! Of course my favorite Wooden Stars had to make their appearance on this card. The background I made with Little Miss Paper and did the sort of Marbled Stain Technique on it with Worn Lipstick, Spun Sugar and Brushed Pewter Stains. The metallic stains are really gorgeous and like the way they blend and react with water. If you look closely you can see I used a piece of Tissue Wrap Melange in the back.


With a new year having just happened, Anita Houston couldn't help but think of  "Stars" in an astrological way by means of the zodiac- the Chinese Zodiac that is. 2013 is the Year of the Snake.
I find it fascinating to read the paper place mats at my local Chinese restaurant. They are almost always about what year you were born in, what animal you are represented by, and how other animals affect you.  As a funny side note, I'm a pig, well technically a boar, and my husband is a snake. We are supposed to be mortal enemies. I still like him after close to 21 years, so I don't place much creed in that!
I made a few of these Asian themed postcards to swap out with a couple of people using Distress Stains to create a Marbled Background on the postcard itself. The snake was cut from Kraft Paper and embossed with Tim's Bubbles Texture Fade.


Homeschooling is a big part of Ashli's day to day routine. Always eager to learn, her three girls certainly are her star students!
 
I couldn't wait to play with this Dear Lizzy Fifth and Frolic paper! The cute office, home, and love themes combined with the soft colors make it the perfect collection to scrap about our homeschooling adventures. With my papers all layered up, I cut some Stars with my Sizzix to tuck around and layer up. A few Studio Calico Stars add to the dimension while my glittery title adds the perfect amount of sparkle to this page all about my star students!


After having had too many ideas for star projects, Anna-Karin decided to make four star struck ATC's.
I like using stars in my projects and for this week, I ended up both using stars and having a star theme. The lovely images from Artistic Outpost's Picture Star set were stamped on glossy cardstock, inspired by old black & white photographs. I tinted the images lightly with Distress Inks, and used only grey and black dye inks to colour the background of the ATCs, placing the focus on the stars of the show. The small stars were die cut from black and white cardstock and covered with glass glitter. Film strip ribbon and pearls gave the finishing touches to this starry theme.

Finally, I (May) wanted to play with new distress paints and some paste - two starring supplies on my desk these days.
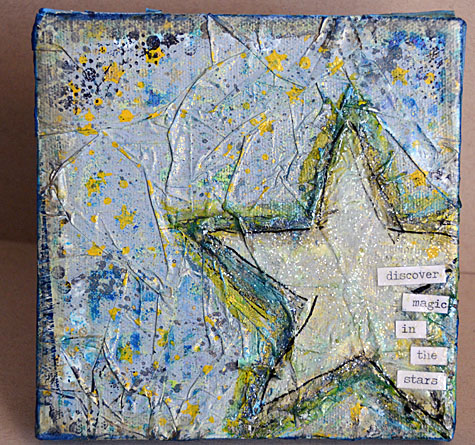
This 8" canvas went through a lot of layers and a lot of experimenting before the final piece was made. I used my star adhesive PPA with some tissue to give me a base layer and texture to the piece, then through trial and error (including a set of star cookie cutters!) I layered paint, stamped stars, and much more until I was happy with the final results. This little beauty will now hang in my studio and remind me to keep playing and experimenting with my wild creative ideas.


Whether you journal about a close encounter with a celebrity, relive Hollywood's glory days, use a star punch, or just share something with a supply currently 'starring' on your desk we look forward to seeing your creations! 
Be sure to click on our design team's blog links so you can learn more about what they love in their crafting and see more photos (and full supply lists) for their projects.
 
As always, Simon Says Stamp is giving away a $50 gift voucher that will go to a random entry chosen by Random Generator. To qualify all you need to do is create a new project that ties in (in any way!) with our theme and post it, along with a link back to this challenge, and add a link here. This challenge will end at 11:59pm on Sunday February 3rd EST.

For the full rules, read the "challenge rules" posted in the side-bar here on our blog.


Friday, January 25, 2013

winners: Lace challenge

I'd like to thank Simon Says Stamp for another great chance to win a $50 voucher!!

The lucky (randomly drawn) winner for the lace challenge is...

83 Laurart  

Please claim your prize within the next two weeks by emailing May with your details. Now let's talk about the top 3 projects as chosen by the Stamp & Show design team.  This week the honors go to:


6 cheryl
39 Redanne
48 butterfly

Be sure to visit their blogs and check out their amazing entries. So inspiring! Congratulations to each of you on a challenge well done! Please email May for the Top 3 Blinkie.
 
I'd like to thank everyone who took part in the challenge. It is always a joy to see what you create. I'd also like to say thank you again to Simon Says Stamp for their generosity - each week we give away a $50 gift voucher to the shop that you can use to buy all kinds of fabulous stamps, inks, and paper crafting supplies. Remember - you just need to enter the challenge each week to be entered into the drawing!

Monday, January 21, 2013

Challenge: What are you known for?

What are you known for? Do you always have a cup of coffee in your hands? Are you forever adding brown ink to the edges of everything? Is no project complete without a button? Whether you feel like being inspired by something you’re known for in your crafting, or if you’d prefer to scrapbook or journal something that you are known for in general we can’t wait to learn a bit more about you and your crafting. Absolutely anything goes as far as your challenge inspiration and project type with this one of course - we just want to see your wonderful style and signature crafting! We hope you'll join in the challenge.

Before we get any farther I'm happy to announce that we have a new member joining our team - and we couldn't be more excited! Please help us welcome the amazingly talented Anita Houston to the team! Anita frequently participates and creates beautiful things for our challenges on a regular basis so we are all very excited to have her join us.

For her first project with us, Anita has made a 16x20 inch mixed media painted canvas based on some photos she took of her husband's local hangouts to gift to him. 

 First of all, what an honor it is to be here! WOW! Thank you so much Simon. I am still pinching myself! However, I was very taken aback by my very first challenge design. It was the hardest one I've ever had, and it caused me to do a lot of self reflection as a crafter. I have no idea what I am known for creatively speaking, because I like to do pretty much everything that is creative, or at least try it. So after careful thought, I hope to be known for being able to create a scene, as it seems that I make a lot of projects depicting a scene of some sort. Personally speaking though, you can say that I am known for being very happy, because it's a thrill to be on this DT with all of these fabulous people!

To make this golf course scene I used several colors of Claudine Hellmuth's Acrylic Paint as well as Ranger's Acrylic Paint Dabbers. A Hero Arts Newspaper Skyline Stamp was used with Archival Inks onto tissue paper to create the downtown buildings. Several different foliage stamps from Tim Holtz and Wendy Vecchi were used with the paint. Wendy's Embossing Paste made the clouds and some of the hedges and rough areas,  along with a little Flower Soft. Finally, lots of Idea-ology metal pieces were used to make the oil pump.


Ashli asked her friends and family what they would say she was known for and the answer was unanimous!
It's true, I do love to be comfortable. All of my friends and family know it and when I asked them what they would say I was known for, they all answered, "wearing pajamas!" In fact, I often forget that I have them on and will head out for the mail or a little time in the garden in my polka dot get-up. I'm sure it's quite amusing to all of the neighbors! I even had this silly picture I snapped of myself while on a recent camping trip and this was the perfect opportunity to scrap this little quirk of mine. After grabbing some Basic Grey Soleil paper and some Studio Calico bits and pieces, I added some texture with a bit of white paint and my go-to Studio Calico stencil. Some simple layering and a few Crate Paper Chipboard pieces complete this fun page!

Tracy created a collaged piece which she added to a frame showcasing some of the things she is known for.
All my close friends and family know I love hearts, I collect anything heart related, jewellery, home decor pieces, garden ornaments you name it, I have it.  I am also a lover of rustic and natural pieces and my framed home decor piece showcases that perfectly. Hearts - check, cut using the Alterations Love Struck Die; texture (I love texture) - check, added using Wendy Vecchi's White Embossing Paste; I love the embellished look - check including buttons from Prima Flowers Nature Garden Wood Buttons to name but a few of my  embellishments used in this piece. I had to remove the frame to take some photographs due to the glare from the glass. Why do I always make pieces that are so difficult to photograph? I am also known for not thinking things through, I just create what is in my head without any thought about how I will photograph said piece!

 
Suzz  had to think about this challenge a bit,  but ended up combining quite a few things she loves in one card.


When I was thinking about what I am known for I thought about images, colors and my creative process.  My favorite images include anything with wings. The Stampers Anonymous Classic #1Stamps has a beautiful Dragonfly which became the focal point of my card. My other great passion is colors and how they complement, highlight  and reflect off one another.  This was the other main component of my card by using the  Metallic Distress Stains to create soft monochromatic effect with a hint of silvery/blue. The  Mistakes and Creativity Sentiment  captures what I feel like when I am creating.  I think the creative process is a journey for me, I am always taking different paths and never know where my artistic journey is going to end. 
 

You can always count on Candy to create something detailed, dimensional and different.
It's hard to determine what you're known for when you try to hard to not be pigeon-holed into a particular style or genre.  I love all things vintage.  I love Tim Holtz style.  I love dimension and I love detail.  But, I try to keep my ideas fresh and different.  So, I incorporated the things I love into something that I am NOT known for; making a card.  Top that, an easel card with a drawer!  Now THIS was a challenge! Pink Paislee's London Market Papers were the basis for this card.  I added Coffee Archival Inked stamps from Tim Holtz' Stuff To Say and Attic Treasures.  Add a sweet little butterfly from Tim Holtz' Mini Blueprints 2 colorized with Tattered Rose and Bundled Sage and let it flutter through the beautiful trailing Prima Avon Roses.  I have to admit, it was much easier than I thought it would be to create this shabby chic inspired card.  Don't you love it when that happens?


Trace almost always has some homemade inked papers on her project.


I believe in my crafting projects, while at least lately I am known for making my own background papers. Being a little OCD/perfection striving, my biggest struggle is covering up the already pretty backgrounds. My crafty friends see me struggle with this all the time. So I have bought an art journal in hopes that it will free me up to be more spontaneous and just let go- I hope to show you in the future a more messy and free me. For this background I used some of my favorite spray inks: Heidi Swapp Color Shine in colours Primrose and Sweet Cherry, and Dylusions Ink Sprays in colours Bubblegum Pink and Postbox Red. I have added a few other favorite elements that you see in many of my projects: My Favorite Things Rolled Roses die using Tim Holtz Idea-ology Grunge Paper, and a Word Band also from Tim Holtz Idea-ology line.


If you'd ask what Sandra Mouwen is known for, the answer would be her use of embellishments.
I do like my Wooden Stars and my Jute Twine dearly. If I get the chance I use it on everything. In my personal life I'm known as the lemonade girl. Because I drink lemonade all day... Back to the card, it's the invitation to my birthday party. I made the background from scratch, and I did that by using my favorite Script stamp. I made some splatters with the Dylusion Sprays Vibrant Turquoise and Black Marble and for some sparkle Glimmer Mist Aquamarine. I so like the font of the Memory Box Lower Alphabet dies. Before I die cut the letters it painted the Black Bazzil cardstock with some Pearl Paint Dabber. It gives the cardstock such a pretty silver color.


Anna-Karin made a layout which is her in several different ways.
I made this layout after a fun, but very busy, day with two friends. Although it was great, I needed some quiet time afterwards, and since I love being outdoors, I decided to scrap this photo from a trip to the sea. The layout includes some of my favourite things: ink turned into watercolour, resist stamping and mist, die cuts, more stamping, white embossed vellum, a clear element, a wood veneer person, and some great quotes.The background was misted with Dylusions ink and I used the Word Play die for the large letters.


Sarah thought talking was the most honest answer to this theme but as it is all about crafting she went for the three D's! Design, dimension and detail...
I had to think for a while about this challenge theme as I like all kinds of styles, colours and crafting but a look back through my blog and a rummage in my stash soon showed me the light! I figured my love of the three D's could best be illustrated with a trio of Wendy Vecchi mini Art Parts lovelies and stamps. I love using a combination of reds, greens, blues and browns and Distress Stains are just fabulous for quick coverage. I love designing and always spend hours working on composition, jiggling all the pieces around until I think it works. These three pieces all finished with Blossom Bucket Buttons are set onto an old folding ruler for an original and very handy wall mount.


Dan likes to try and get as much value from his stamps as he can.
Although I have a lot of stamps, I still think carefully about each purchase, evaluating how much use I think I'll get out of a particular stamp or set.  What I like best of all are images that have potential to be used and re-used in many different ways.  I think one of the things I'm probably known for is my habit of "disguising" my stamps in order to get more use out of them.  Take the phrenology head stamp in the set of 3 cards shown above, it offers so many creative possibilities for extending it's "life" by making a few small changes to the way it's utilised.  I also made use of Cavallini & Company Numbers tape and the Darkroom Door Woodgrain background stamp.


I (May) am certainly not known for following rules when it comes to my crafting so using the new Simon card kit for a scrapbook layout seemed perfect for this week's challenge.
I'm a happy crafting kind of girl, so I cut loose and just let myself play with no expectations this week. Funny, many of my most 'known for' bits in my scrapbooking managed to show up!  Gotta love that. Speaking of love - I love scrapbooking with the Simon card kits because it gives me bits and pieces of papers and embellishments (not to mention stamps!) and lets me use up my own plentiful stash (something else I'm known for!) of alphabet stickers! I adore pink, doilies, hearts, chocolate, and of course my daughters - so I'm delighted that so many favorites of mine and things I love were able to be worked into this one layout.
 
I hope that you are as inspired as I am to embrace your favorites,take a closer look at what you are known for in your crafting, and joining us in this challenge as well. Be sure to
click on our design team's blog links so you can learn more about what they love in their crafting and see more photos (and full supply lists) for their projects.
 
As always, Simon Says Stamp is giving away a $50 gift voucher that will go to a random entry chosen by Random Generator. To qualify all you need to do is create a new project that ties in (in any way!) with our theme and post it, along with a link back to this challenge, and add a link here. This challenge will end at 11:59pm on Sunday January 27th EST.

For the full rules, read the "challenge rules" posted in the side-bar here on our blog.


Friday, January 18, 2013

Winners: Something Old challenge

I'd like to thank Simon Says Stamp for another great chance to win a $50 voucher!!

The lucky (randomly drawn) winner for the   challenge is...

66 butterfly

Please claim your prize within the next two weeks by emailing May with your details. Now let's talk about the top 3 projects as chosen by the Stamp & Show design team.  This week the honors go to:

 38  carol fox
54  patricia koedood
153 Luce

Be sure to visit their blogs and check out their amazing entries. So inspiring! Congratulations to each of you on a challenge well done! Please email May for the Top 3 Blinkie.
 
I'd like to thank everyone who took part in the challenge. It is always a joy to see what you create. I'd also like to say thank you again to Simon Says Stamp for their generosity - each week we give away a $50 gift voucher to the shop that you can use to buy all kinds of fabulous stamps, inks, and paper crafting supplies. Remember - you just need to enter the challenge each week to be entered into the drawing!

Monday, January 14, 2013

Challenge: Lace Love

Doilies to add a bit of elegance, a lace-like border punch to add that touch of detail, a bit of frilly trim to accent your project - nothing quite says vintage elegance like lace and doilies. Whether a finishing touch or a major element - we can’t wait to see what you share for this challenge.

This will be Terry's final challenge with us as a member of the design team. I'm sure you've enjoyed her projects and creative spirit, and I hope you'll join me in wishing her well. Her final project is an amazing altered heart, done up in her signature shabby chic style.
As you know I just cannot help myself when it comes to hearts, when I saw this HUGE heart I just knew that I had to alter it and to think that when I looked at it for the first time, it was white. Not anymore! I played with Spun Sugar, Tattered Rose and Vintage Photo distress stains and lots of crackle on the background to give it the fragile look. The doily underneath the cute little image is worked on with Distress Stain, glimmer mist and distress stickles  Rock Candy. A few roses were dipped in UTEE just like the Papillion and to finish the Huge Altered Heart I placed a the sentiment cherish. Because you always have to cherish a heart.
With three little girls at home, Ashli's days are full of moments perfect for a little touch of doily and lace.
Doilies and lace, sugar and spice... anything nice. These are the things little girls are made of! Armed with my Jenni Bowlin Doily PunchAmy Tangerine Doily StampMartha Stewart Embroidery Punch, and a Doily from the kitchen I set out to scrap an everyday moment with my little ones. First, I used one of my doilies from the kitchen as a stencil to create a bit of depth in the background. After stamping on doily shapes for contrast, I decided to play with the idea of mixing the modern trend of the pie chart with the vintage feel of the doily. I love the result! Some punched doilies and Studio Calico Wood Veneers embellish the page while a vintage piece of lace provides the perfect finishing touch. 
Trace likes to add an element of lace to almost all her cards.

I have been spending a lot of time lately browsing Pinterest- it's so addictive! I have seen quite a few woven projects popping up, so that was my inspiration for this challenge. From my lace stash I chose Kaisercraft Lace Packs in colours white, cream, and natural and Melissa Frances Lace Trim packs in colours cream and white. This woven lace panel gives the card an extra nice raised texture. To continue the vintage feel on the card, I reached for this awesome Simon Says Stamp die and stamp set- Apothecary Labels. 


Sarah immediately thought of the fabulous lace background stamp by Wendy Vecchi...
It's been a while since I've used my lacy stamp from Wendy and as I thought lace and love sounded good together I went for a heartfelt hanging created from Art Parts. I wanted to use colours and a design that could be fitting for a gift for many an occasion and not just Valentine's Day which is just around the corner! I love how Art Parts take on the colours of Distress Stains and Inks so well and I'm also making use of my Summer Distress Colours all year round! I'm such a fan of Wendy's stamps and Art Parts and just love how quickly a dimensional piece can come together. Not had your Arty Party yet? Then it's time to get crafty Wendy style!

Tracy was inspired by a gift from fellow team mate Suzz to create a vintage elegant wall plaque.


Suzz sent me this fabulous bracket book cover which I thought would be perfect for an elegant vintage plaque and was the starting point for my creation.  When I think of lace and doilies I always think of creams and browns and natural materials.  I felt that the Artful Silhouettes image was perfect for my focal point set in a Maya Road Vintage Metal Heart Tart Tin, coloured with Ginger Alcohol Ink, set against a Royal Lace White Heart Doilie, coloured with Brushed Corduroy and Vintage Photo Distress Inks.  I am really happy with this piece and will find it difficult to give away!


Anna-Karin collected pretty pieces of lace and ribbons as a child, and thought this tag was the perfect place to use a few of those pieces.
My tag celebrates the lovely texture and lightness of lace and what goes better together with lace than some vintage fabric and a quite a bit of machine sewing. The sweet Tim Holtz image was stamped twice on Specialty Stamping paper with Coffee Archival ink and colored lightly with Distress Ink. Two canvas butterflies flutter across the tag, one with a piece of lace as its body, the other with a cute mini wooden spool wrapped with a strip of magical old book paper.


Dan took a different approach to the word "lace" for his travel-themed project.


You know, I'm full of admiration for folks like my team-mates here at SSS&S who can make beautiful things with lace, their projects here are stunning. I thought I'd take a slightly different tack with it, so I've foregone the frills and flounces and used Tim Holtz Paper String as a lace to bind together the panels of my travel project instead. I've used the Road Trip and Remnants stamp sets along with some panels from the Destinations paper stack and I musn't forget to mention the Crop-a-dile, it came in very handy for this!


Suzz  was thinking of linen, muslin and lace all together to give a soft and feminine look to her project.
When I heard lace I was thinking of the soft textures that go with vintage lace.  I started with this beautiful linen mini album from Maya Road Linen Art Journaling Book  I layered a frame of vintage lace with a piece of muslin. The muslin was primed with Adirondack Snow Cap Paint Dabber and a coat of Adirondack Sandal Paint Dabber to create a surface for stamping.  I thought it would be fun to hang a tag pocket with mini tags using images from Artistic Outpost Birds of a Feather and Bluebird.  The best part of this project is I have a few more linen pages to use in my journal.

Happy girl Sandra Mouwen really needs to use her doily stamps and lace die more
You might not know it, because I hardly use them in my projects, but I really love doilies and lace. Today is my birthday, so I'm a very happy girl and Happy is just what this tag represents. To create this happy bright purplish pink background, I've used Picked Raspberry and Seedless Preservers Distress Ink. On the edges I've stamped with my favorite Doily Borders Stamps. I think that the Mini Sprocket Gears look like doilies too. Finally I've put my Vintage Lace Decorative die that I had for over a month to use!


Candy is becoming quite the couturier with this three tiered doily skirt.
 I don't know what's going on with me this year so far! I'm really into "girly".  I loved doing this 6x6 board with Perfect Pearls on black cardstock.  Tim Holtz' random stamped Honeycomb with a Gold Paint Dabber help create a neat iridescent wallpaper background.  The Poppystamps Window and Flower Box make such a cute addition to the wall paper!  Enter the doilies. One for the curtain valance.  Then, add Tim Holtz' Sewing Room Dressform embossed with Flourishes Texture Fade and covered with three tiers of crinoline Distress Doilies to create a pink, poofy skirt.   

Join me in wishing Sandra a Happy Birthday, and Terry best wishes as well. It's another inspiration filled week here- and now it is your turn! Please feel free to visit the design teams blogs for more photos and details about their projects, then run wild in your own lace direction - whether you 'lace up' something as Dan so cleverly did or if you want to create something frilly and feminine. Have fun!
 
As always, Simon Says Stamp is giving away a $50 gift voucher that will go to a random entry chosen by Random Generator. To qualify all you need to do is create a new project that ties in (in any way!) with our theme and post it, along with a link back to this challenge, and add a link here. This challenge will end at 11:59pm on Sunday January 20th EST.

For the full rules, read the "challenge rules" posted in the side-bar here on our blog.