Monday, October 15, 2012

Challenge: Your Favorite

Favorites really are the best, aren't they? This week, we challenge you to share a favorite! This could be a technique, product, photo, idea, project type- or even a favorite theme. Anything goes as long as you have a note on what in your project is your "favorite".
 
 Let's check in with the design team and see what their favorites are...


Anna-Karin altered a blank wooden frame into something pretty special.
One of my favourite techniques is to build up layers of UTEE and stamp into it. Here I also added some black paint and Biscotti Perfect Pearls mixed with Perfect Paper Adhesive and brushed on the frame for lots of shine. This gorgeous face stamp from the Stamper’s Anonymous Classics #5 set fits perfectly into the frame. I embellished the frame with a word stick, Vintaj piece, facet, philosophy tag, mini gears, game spinners, and corked vials filled with inspiration. The metal pieces were aged using the Weathered Copper inks.


Halloween is one of Sandra Mouwen favorite themes. She loves the spookiness of it!
Halloween seems like so much fun. I wish they celebrate it more in The Netherlands so I could experience it like I should! Last year I bought the Halloween Silhouette Embossing Folder and haven't had the change to use it yet. So on its first use I it got all dirty by inking it up with the Fall Distress Inks. I inked the raised areas with some Black Soot Distress Ink. To make it a bit interactive I inked up some tags and folded them as flaps.
 
 
Trace wanted to combine a few of her favorites, so she made a mixed media board full of "wear your sunglasses " bright colours and a big shiny heart.
Bright colours just make me happy, and pink and red together are one of my favorite colour combos! The background on this mixed media board has many layers of mediums... Jenny Bowlin chewing gum paint, Dylusions bubble gum pink ink spray, and Fabel Castels Big Brush Pens and Pastels. I adore hearts on projects, so I knew I really wanted to add one big shiny statement heart to the center. Rangers Foil Sheets are so easy to work with to give you that shine. I added many different pink and red shades of Rangers Alchol Inks and accented it with my Krylon Silver Leaf pen.


Halloween is also a favourite for Tracy, showcased in her spooky rust like coffin.
I have to say a huge THANK YOU to my fellow teamie Candy,  for sending me some fabulous Halloween goodies to play with, she knows me so well!  These wonderful gifts including the coffin inspired me to create this spooky piece. Halloween being a favourite for me, I like to make the most of every opportunity to indulge my passion for anything spooky. Using the On The Edge Ornate die gave a perfect trim for my coffin, but this time around using the negative cut out. I love the little spider cut using the Memory Box Dangling Spider die along with the fabulous dimension created from Melissa Frances Pearls. But does my coffin hide a TRICK or TREAT?
 

Ashli's favorite supply is patterned papers and for this week, she is not holding back!
I can't help it. I am totally in love. In love with patterns, especially tiny repeating patterns. Echo Park's Everyday Eclectic collection has the perfect mix of whimsy, color, and of course pattern. For this week's theme, I am putting all of these papers to work on this photo-less layout that will be the cover page to my 2012 album. After selecting my most favorite pattern for the background, I cut up the journaling card sheet and layered those bits up with some messy-stitched circles. My favorite Thickers and wood veneer accents finish off my layout that is filled to the max with my favorite patterns!
 
 
Suzz is back to her favorite books. 
I was inspired by folding the pages of the books to create architectural features.  I took an old children's book and started folding the pages.  I added punched edges to create a beautiful arch.  After I finished the folding I sprayed the entire book with a coat of Dylusions Ink.   To frame out the ends of the book I created matching clocks. I cut the clocks from the Sizzix Tick Tock.  The birds and branches are nested in the pages of the book and are using it as there home.


I (May) loaded this tag with my favorite products and techniques!
From distress inks to stenciling, playing with resist prodcuts to aging with rock candy crackle I had an incredible time making this gift tag. Every single piece on here is a favorite - including my techniques. One of my favorite things right now is using stencils with a blending tool and distress ink - I love the color and all it adds to my projects.

 
Terry's favourite technique is embossing, she made an embossed Christmas envelope with Tim's technique.
I really love the Christmas holidays and making presents for everyone, Christmas time is the best time of the year for sharing love and gifts to the loved ones in your life. I started out with a Envelope and played around with the Silver Shiny material. I embossed the sentiments from Tim's stamp set Silhouettes and sprayed lots of glimmer mist on top to give it more shine on top. The snowflakes and deer are also from the stamp set, the perfect set to use for making Christmas gifts. And a fun thing to play around with is Utee, to see the melting process that is just great and then to create something with it. The Metal Letters are so much fun to play around with, so this time I put them onto a rope. A nice way to finish the Christmas envelope.


Dan's favourite product line is Tim Holtz's Distress range, and he's used both the stains and ink pads on these business card matchbooks.
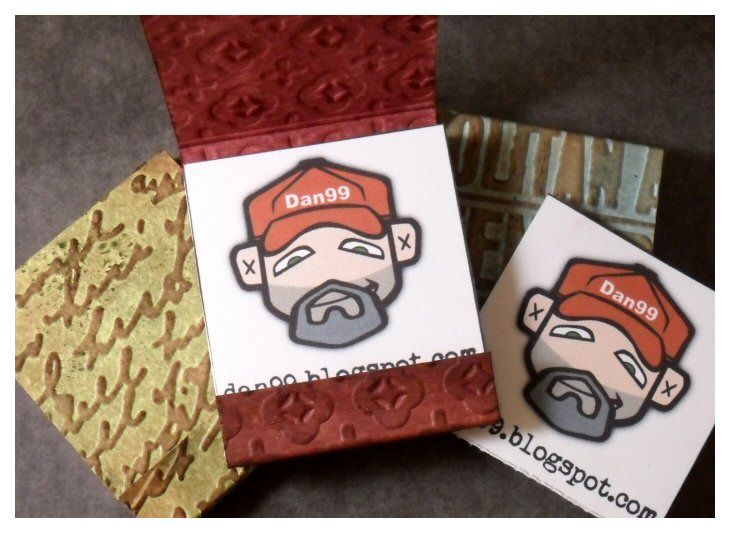
I had the idea for this project when I was absent-mindedly staring off into space and my eyes fell on my Tonic mini perforator tool.  It's pretty essential for this, without it those business cards just aren't going to tear off nicely!  I used Distress Stains to colour the matchbook outers before embossing them with my Cuttlebug and a range of embossing folders.  Finally I applied a light coat of walnut stain Distress Ink to pick out the details.


Sarah just loves to play around with her stamps collections to create master-boards at the moment and that was the inspiration for her mixed media card...
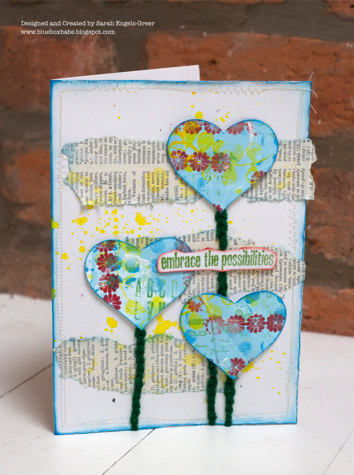
I just love rubber stamps in all designs, shapes and sizes and there is no better way to play with them all than on a stamped master-board. It gives me the chance to combine all my favourite designs and create a harmonious base from which I can cut various shapes to use in my crafting. I've gone for hearts, a fabulous Wendy Vecchi sentiment and torn dictionary pages - all three being top of the list of my favourite 'go to' crafty ideas... A splash of Dylusions Ink Spray adds that little bit of wildness which always does me good.
 

One of Candy's favorite times of year for crafting is Halloween.  She has combined that with her love of creating dimensional pieces in this surprise jack-in-the-box.
 I totally love Halloween for crafting!  Whether you're a fan of cuter, grungier or classic vintage images; there are tons of products to incorporate into your Halloween creativity.  I also love dimensional and interactive home decor pieces.  So, I combined those things to create this 4x4 jack-in-the-box featuring those wonderful vintage Halloween images from Graphic 45 Happy Hauntings 8x8 paper pad.  Every side has a different scene.  Some embellished with Black Diamond, Platinum and  Paprika Stickles.  Others featuring Tim Holtz Ideaology Foliage flowers or Seasonal Halloween Muse Tokens.  Open the top and a surprise vintage moon man greets you!
 

I had a great time with this challenge, and encourage you to check out each of the design team member's blogs for more photos, supply lists, and more. Simply click on their name (above the photo of their project) to visit their blog.

Now that we've shared the team creations - we're ready to see yours! As always, Simon Says Stamp is giving away a $50 gift voucher that will go to a random entry chosen by Random Generator. The challenge will close at 11:59pm Eastern time on Sunday, October 21st and the winner will be announced during the following week. To qualify all you need to do is create a new project that ties in (in any way!) with our theme and post it, along with a link back to this challenge, and add a link here.
For the full rules, read the "challenge rules" posted in the side-bar here on our blog.

We can't wait to see what you make!


Friday, October 12, 2012

leafspiration winners!

Reminder: Our rust challenge is still open this week - be sure to enter!
 
Now let's talk about last week's challenge winners! What a leaf-tastic week we had! I'd like to thank Simon Says Stamp for another great chance to win a $50 voucher!!

The lucky (randomly drawn) winner for that is... 2- BJ

Congratulations! Please claim your prize within the next two weeks by emailing May with your details.


Now let's talk about the top 3 projects as chosen by the Stamp & Show design team. So many leafy creations this week - the team had a tough time choosing! This week the honors go to:
 
124 Suzanne Bouchard

Be sure to visit their blogs and check out their amazing entries. So inspiring! Congratulations to each of you on a challenge well done! Please email May for the Top 3 Blinkie.
 
 
I'd like to thank everyone who took part in the challenge. It is always a joy to see what you create. I'd also like to say thank you again to Simon Says Stamp for their generosity - each week we give away a $50 gift voucher to the shop that you can use to buy all kinds of fabulous stamps, inks, and paper crafting supplies. Remember - you just need to enter the challenge each week to be entered into the drawing!

Monday, October 8, 2012

Challenge: Rustification

From the Rusty Hinge distress products to rusted bolts, rust cardstock to aged or tarnished metal - we want to see your take on rust this week. Will you use crackle paints or alcohol inks to rust or add age to your project? Or literally use a rust color something? Perhaps you’ll take a ‘rustic’ approach instead and stretch my meaning. Whatever you’re up to, we can’t wait to see your inspired creations. 

With Halloween only a few weeks away, Sandra Mouwen has tomb stones and rusty fences on her mind.


I really like distressing and aging things, so this weeks challenge is right up my alley! It's almost Halloween and I wanted to make a tomb stone card. I've created this tomb stone with the Dylusions Perfect Splatter Technique. I used Black Marble Dylusions with lots of Pewter Perfect Pearls Powder. The letters are cut out from Silhouette Silver Vinyl. The Fence I altered so I really looks very rusty. I did this by using Black Soot Distress Embossing powder and lots of paint such as Espresso, Pitch Black and Terra Cotta.


You find yourself in a haunted house, rummaging through piles of dusty cobweb covered books when you come across Candy's spooky, eerie, "rusty" Book of Spells!
 You have GOT to love the versatility of Tim Holtz products for this piece! I transformed this plain paper mache piece into a rusty "Book Of Spells" thanks to some acrylic paint techniques, Grungeboard and some really fun die cuts.  The spooky raven and cats from Mini Cat & Raven Movers and Shapers, the scary spider from Candelight Fright, the pointy edging at the bottom from Mini Scallop and Pinking, the ornate top piece from Scrollwork all worked perfectly together to create this design.  The "Book Of Spells" letters are from Tim's Mixed Minis and Grungeblocks collections.  But oh...wait...more spooky surprises await when you open the rusty cover!
   
 
Rust brings many things to mind, but for Ashli, all she can think of is her home of almost 10 years, which happens to be quite a fixer-upper! 
We have so many photos from home reno projects tackled in the last 10 years. This particular picture is one of my favorites and was a perfect match for a "rusty" page. After rusting some washers in vinegar, I layered up my photo with Lily Bee, Studio Calico, and October Afternoon patterned papers. Then, some punched papers layered under my rusty washers and stitched on with Doodle Twine make some fun little embellishments. Our home seems to be a constant work in progress and this week's theme was the perfect time to scrap it!
 
 
When Trace thinks of Rust, she thinks of manly, but because she always loves a challenge....she decided to try and make a "girly" card.
 In order to make this girly card I knew I had to start with my Hero Arts Lace Background stamp. It is one of my favorites, and oh so girly! To get the rust colour I wanted, I combined two different embossing powders,Tim Holtz Distress in vintage photo and American Crafts Zing in copper metallic. Of course a girly card would not be complete without flowers and lots of them! I knew the perfect dies for this would be Simon Says Stamps Bella Bloom and Delicate Dahlia and My Favorite Things die Mini Rolled Roses.
 
 
Suzz knew she wanted to rustify her wooden paint stick and stir up some Haunting Fun: 
I had just picked up this wooden paint stick and thought it would be fun to rustify the surface.  My son and I discussed the best colors to create a rusty effect and we decided to go with black and gold.   I used some of the Stampendous Embossing Enamel Aged Gold and Tsukineko StazOn - Jet Black ink to create the colors in my rusty technique.  The fun Halloween stamps are from Graphic 45 Happy Haunting #1.
 

Anna-Karin made rusty and grungy pop-up card (don’t miss checking out the inside):

I love trying out different ways to create a rusty and old feeling. On this card, I used a combination of Ranger’s Rust Antiquities Embossing Powder and Adirondack paint dabbers. The focal piece on the outside is a rusty Vintage Typewriter, placed on top of a stack of old book pages aged with inks and a coffee stain stamp. A heart flutters by on its way to the receiver of the card. On the inside, you’ll find the fun Sizzix Winged 3D Hearts Pop-up, some stamping, and more rusty surprises. 
 

Inspiration came in the form of new techniques from an on-line workshop for Tracy this week to create her spooky rust effect shadow frame.
This is one piece that I really enjoyed creating because I love all things rusty, I love Halloween and I love texture and all those are captured in abundance in my spooky piece. Lots of texture from Gesso and dimension from a framed skull cut six times from mount board using the Sizzix Skull Die. No spooky creation is complete without bats which I have used around the outside edge of my frame adding two to the central panel, all cut using the Bewitching Hour die. This will have a place of pride on my lounge coffee table during our Halloween celebrations.
 

Terry was playing around with a Top Hat and made it a Rusty one!
I always wanted to make a Top Hat, and I thought it looked so classy I took the opportunity to decorate one in a vintage style for this week's challenge. When I started my project it was just a black plastic hat, can you believe it? I used lots of layers of Gesso, Walnut Stain Distress Stains and Crackle, and I am pleased with the outcome. The roses are worked on with Walnut distress stain and the Antiqued Bronze Crackle. On the side I played with a sprocket gears and game spinners and since I love butterflies I placed a HUGE butterfly at the back of the hat to finish my project. 
 
 
Sarah was in her element with this week's challenge theme. Creating rusty tones and textures with Alcohol inks and metal are one of her all time favourite things.
 When I see an old tin at a flea market or find one lurking in my hubby's shed then my fingers are just itching to alter it into something new, but old looking, if you get my drift! This old bicycle repair kit tin was the ideal candidate and makes the perfect keepsake box. After sanding the box down I used lashings of Alcohol Inks and Distress Powder to create my rusted look. I think aged grunge roses are the perfect companion and so I created two using embossed Metal Foil Sheets before finishing my tin with an Idea-ology Ball Chain wrap and Word Band.


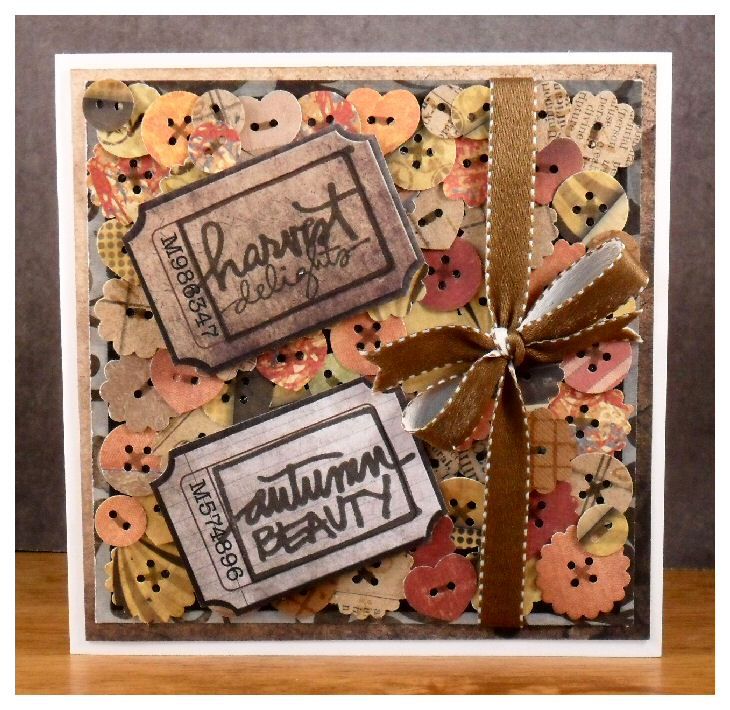
Dan's card was inspired by the rust colours of autumn.
When I was originally planning a project for this theme, I decided to collect some rusty-coloured autumn leaves to use as a feature.  Once I'd pressed them and came to use them they smelled awful, so I had to have a rethink.  I've still taken autumnal colours as my inspiration but used buttons as the basis for my carpet of leaves.  As you can see, it took quite a few to cover my card, luckily the Martha Stewart buttons punch makes 5 at a time! The sentiment stamps are from the Ali Edwards Leaves are Lovely set and the tickets are from the Tattered Time card stack.  Buttons were punched from Tattered Time, Kraft Resist, Destinations and Lost and Found card stacks.

 I (May) have been playing with ways to take cheap decor pieces and turn them into something special using my craft stash. This challenge and a $2 pumpkin were made for each other!
I love decorating my home with fall and autumn and leaf themed items - it means that they can be up through November, and I do love decorations that can stay up for more than a few weeks! I used alcohol inks, then acrylic paints, and finally dylusion ink sprays on my pumpkins. For my leaves a combination of distress, rock candy, paint, and dylusions came together to make truly random fall paper leaves. I love my rustic decor - but to take it a step further I grabbed some rusty metal bits and let them accent my pumpkin. Now I've got a customized pumpkin that looks much better than the cheap white thing I came home with!

 
I had a great time with this challenge, and encourage you to check out each of the design team member's blogs for more photos, supply lists, and more. Simply click on their name (above the photo of their project) to visit their blog.

Now that we've shared the team creations - we're ready to see yours! As always, Simon Says Stamp is giving away a $50 gift voucher that will go to a random entry chosen by Random Generator. The challenge will close at 11:59pm Eastern time on Sunday, October 14th and the winner will be announced during the following week. To qualify all you need to do is create a new project that ties in (in any way!) with our theme and post it, along with a link back to this challenge, and add a link here.
For the full rules, read the "challenge rules" posted in the side-bar here on our blog.

We can't wait to see what you make!


Friday, October 5, 2012

Sparkle challenge winners!

Reminder: Our leaf challenge is still open this week - be sure to enter!
 
Now let's talk about last week's challenge winners! Every creation was so great to see, especially reading about how people were inspired by the sparkle challenge. I'd like to thank Simon Says Stamp for another great chance to win a $50 voucher!!

The lucky (randomly drawn) winner for that is... 50 Elly

Be sure to check out her project too - she has a very cool behind the scenes look at her project - and stickles really is the perfect accent for it. Congratulations! Please claim your prize within the next two weeks by emailing May with your details.
 

Now let's talk about the top 3 projects as chosen by the Stamp & Show design team. So many sparkly creations this week - the team had a tough time choosing! This week the honors go to:
 

Be sure to visit their blogs and check out their amazing entries. So inspiring! Congratulations to each of you on a challenge well done! Please email May for the Top 3 Blinkie.
 
 
I'd like to thank everyone who took part in the challenge. It is always a joy to see what you create. I'd also like to say thank you again to Simon Says Stamp for their generosity - each week we give away a $50 gift voucher to the shop that you can use to buy all kinds of fabulous stamps, inks, and paper crafting supplies. Remember - you just need to enter the challenge each week to be entered into the drawing!

Monday, October 1, 2012

challenge: leaf-spiration

Whether it’s autumn and the leaves are full of rich colors, spring and new leaves are forming, or any other season I do love leaves! They show off the season like no other thing, and they come in all colors, shapes, and sizes.
 
With so many leaf and tree stamps out there, not to mention stickers and papers, I thought it would be a good time to see if we could dig into our stashes for some leaf-spiration this week.
 
Use a real leaf as a mask or to stamp with, dry out a leaf and attach it to your project, use die cuts, fabric leaves, or a patterned paper with a leaf print. There are a lot of ways to make something for this challenge, and I look forward to seeing what you come up with. 

Candy created this beautiful pop up tag in anticipation of her favorite season, Autumn.
This week's challenge theme of leaves immediately took me back to junior high school and a beautiful poem that I have remembered all these years;  "Trees" by Joyce Kilmer.  It's words inspired me to use not only Tim Holtz' Tattered Leaves and Mini Tattered Leaves die cuts, but the entire Branched Tree die cut and Texture Fade in creating this pop up tag. I wanted this tag to reflect the season so I combined Wild Honey, Rusty Hinge, Gathered Twig, Squeezed Lemonade, Picked Raspberry and Evergreen Bough Distress Inks to create that perfect blend of color.  Rock Candy Crackle Paint and Copper Embossing Powder kiss the leaves and tree bark with that extra shimmer, reminiscent of a heavy October morning dew.

Although Sandra Mouwen wishes it wasn't Autumn already, she really loves the beauty of all the different colors of this season.

The great thing about the fall is that it's such a pretty sight. The changes of the colors of the leaves are so gorgeous. I especially love the red and orange colors, and that's what inspired my card for this week. The Dylusion Inks Sprays are so vibrant and perfect for my background. The leaf border is made with the stunning Luscious Leaves stencil, a Copic Atyou Spica pen and to create some interest I used the White Uni-Ball pen. I love the Ali Edwards Autumn Afternoons stamps from Technique Tuesday, her handwriting is fabulous and perfect for this card! For a bit dimension I cut out the stamped leaf and put it on a Memo Pin.

Tracy decided on an Autumnal canvas this week, showcasing the warm reds and oranges of the season.
Autumn is my favourite time of year, I love the cooler season, the warm tones of the Autumn leaves from warm reds, to rustic oranges and weathered browns, a beautiful sight in any garden.  My canvas showcases those warm tones with the use of the Dylusions Ink Sprays in Postbox Red and Squeezed Orange. My trademark texture appears yet again in my artwork this time around using Gesso through a leaf cut from card with the Tattered Leaves die.

Ashli decided that this week's Leaf-tastic theme was the perfect opportunity to craft a leafy home decor piece for her mantle.
Fall is my MOST favorite season of all. I just love the rich colors and the spirit of thankfulness. First, I headed out to my garden and grabbed some leaves. After tracing them on water color paper, I went to work with my Hero Arts Paint Set, adding gorgeous fall colors. Once each leaf was cut out, they were tied and stapled together, creating one large area to play. I then pulled some lovely Basic Gray patterned papers from my stash and punched several sizes of circles. With my punched shapes, Inkadinkado Mini Leaf Set, washi, and Pitt Pens in hand, I went to town embellishing my leaves. A hand written title finishes off my Give Thanks mantle piece. 

Trace is not ready to let go of summer just yet.

  I really don't want summer to end! So I made a tag that still screams summer to me with the vibrant colours from the Dylusions Ink Sprays.  The Three Ferns stamp is a real classic from Hero Arts, I just never get tired of using it! Here I used it as a water mark for a subtle look using Versamark and a water spritz. Then I highlighted one of the ferns with Crackle Paint in Rock Candy by Tim Holtz...I am so addicted to this product! Reality did set in, for in my neck of the woods the leaves are already changing colour and falling. So I added some Wild Honey DIstress Ink to the sentiment tag. I like how it picked up the same colour in the background that was created with a salt and ink technique. I finished off the tag with a few butterflies from this very versatile Tim Holtz Papillon stamp set.


Terry decided to make a Metal Foil Tag with the colors from Autumn.
I don't like Autumn for the temperatures, not for the wind, rain and storms..but for the fabulous colors you see on the trees and leaves. I really love the orange and brown colors Autumn gives us. I tried to capture those colors into the Tag that I made. I started out with the Metal Foil for the background. It is so much fun to work with it and play around with Alcohol inks on top. The colors make it look like it is really old too. On top I had lots of fun with the leaf and colored it with Ripe Persimmon and Crackle to finish it I played with Utee. To express how I was feeling at that moment I placed the Bottle Cap with the fabulous sentiment.


Suzz had visions of the fall leaves hanging on the branches along the old wood fence.
The fall colors are so beautiful with the leaves turning. I tried to capture the cool crisp fall breeze using various colored papers embossing them and adding a touch of bronze around the edges. 
The leaves use the  Sizzix Patchwork Embossing Folder to add a touch of texture with the edges embossed with Copper Embossing Powder.  I used the dies to create the leaves and branches.  I can almost feel the cool breezes of fall right now.


I (May) adore everything about fall, and while still battling summer temperatures I tried to wish myself away to cooler temperatures and favorite traditions that I know October will bring....
The Tim Holtz blueprint stamps seem made just for me - and here I used them both in the background and embossed onto a piece of book paper that I colored with distress inks. Going wild and fully embracing this week's leaf theme, I also used some wood leaves, die cut leaves, and I chose some autumn sentiments from a sticker sheet as well. I'm ready for the apple cider and pumpkin pie - not to mention falling leaves and the great autumn colors!
 
 
Anna-Karin loves autumn with all the rich colours and tried to capture it in a mini-book made for some of her favourite autumn photos.
I made the covers and spine of the book using the Sizzix Eileen Hull ScoreBoards Album die and covered it with white sticky back canvas. For the big leaves, I used the Tattered Leaves die, layers of melted UTEE, different colours of embossing powders and then stamped into the hot UTEE. The cover just had to have lots of leaves and branches, cut from kraft core cardstock and covered with Antique Linen Distress Stickles, as well as three Tattered Pinecones. I also used the new fabulous Stamper’s Anonymous Tim Holtz Autumn Blueprint stamps.


Autumn is the season of gift-giving for Dan, so he already has a recipient in mind for this fall-themed giftwrap with matching tag.
All of us in my immediate family have birthdays in the autumn, and the moment that I saw Tim Holtz's Autumn Blueprint stamp set I knew that I could use them to make some great fall-themed giftwrap.  I think that using kraft as the base colour for the paper and co-ordinating gift tag ties in well with that autumn feeling when the air is starting to get crisp and the leaves start changing colour. I used Kraft Resist card for the tag and painted the images with a range of Distress Inks and a water brush.


Sarah was inspired by the Art Parts leaves in her Wendy Vecchi stash and thought they would make wonderful Autumnal wings for her mannequin in her dimensional piece...
I like nothing better than to play around with my collection of Art Parts. I love the wide variety of shapes and designs and how they can be transformed into a different creation every time. I really have a 'thing' for dimensional pieces and like to experiment with the layers and contrasting lines. I wanted to indulge in Fall colours and used my Distress Stains to add the rich tones, followed by lots of wonderful large stamps from many of my Wendy Vecchi sets. You can never have enough of them - or Idea-ology to add the finishing touches!
 
 
I encourage you to check out each of the design team member's blogs for more photos, supply lists, and more. Simply click on their name (above the photo of their project) to visit their blog.

Now that we've shared the team creations - we're ready to see yours! As always, Simon Says Stamp is giving away a $50 gift voucher that will go to a random entry chosen by Random Generator. The challenge will close at 11:59pm Eastern time on Sunday, October 7th and the winner will be announced during the following week. To qualify all you need to do is create a new project that ties in (in any way!) with our theme and post it, along with a link back to this challenge, and add a link here.
For the full rules, read the "challenge rules" posted in the side-bar here on our blog.

We can't wait to see what you make!


Friday, September 28, 2012

Winners: Tape challenge

Reminder: Our sparkle challenge is still open this week - be sure to enter!
 
Now let's talk about last week's challenge winners! Every creation was so great to see, especially reading about how people were inspired by this challenge. Here are the top 3 from the Tape challenge:
 

Be sure to visit their blogs and check out their amazing entries. So inspiring! Congratulations to each of you on a challenge well done! Please email May for the Top 3 Blinkie.
 
Now I'd like to thank Simon Says Stamp for another great chance to win a $50 voucher!!

The lucky (randomly drawn) winner for is...  16 Vada

Congratulations! Please claim your prize within the next two weeks by emailing May with your details. 
 
I'd like to thank everyone who took part in the challenge. It is always a joy to see what you create. I'd also like to say thank you again to Simon Says Stamp for their generosity - each week we give away a $50 gift voucher to the shop that you can use to buy all kinds of fabulous stamps, inks, and paper crafting supplies. Remember - you just need to enter the challenge each week to be entered into the drawing!