Friday, November 23, 2012

winners: no ink challenge

I'd like to thank everyone who entered our challenge this week, as well as Simon Says Stamp for another great chance to win a $50 voucher!!

The lucky (randomly drawn) winner for the Stamping without Ink challenge is...
 
41 Chris Dark

Please claim your prize within the next two weeks by emailing May with your details. Now let's talk about the top 3 projects as chosen by the Stamp & Show design team. It would seem the number to be this week, was nine! Though I must say I was amazed by the creativity I saw with every entry, and all of the ways you creatively stamped this week. Fantastic stuff- and as always choosing the top 3 was not easy! This week the honors go to: 

9  English Teacher Jurgita
29 Jessica Sporn
39 Julia (S-W)

Be sure to visit their blogs and check out their amazing entries. So inspiring! Congratulations to each of you on a challenge well done! Please email May for the Top 3 Blinkie.
 
I'd like to thank everyone who took part in the challenge. It is always a joy to see what you create. I'd also like to say thank you again to Simon Says Stamp for their generosity - each week we give away a $50 gift voucher to the shop that you can use to buy all kinds of fabulous stamps, inks, and paper crafting supplies. Remember - you just need to enter the challenge each week to be entered into the drawing!

Monday, November 19, 2012

challenge: Thank You

Whether you are getting a head start on making thank you cards for the upcoming holiday, hand crafting a gift in thanks, creating a scrapbook page about someone you love, or an art journal page about things you are thankful for - there are a lot of ways to give thanks this week. We challenge you to say thanks in some way with something you

I (May) will kick things off with my fall inspired thank you card.  

The card I make most often is one of thanks, because I don't think you can ever say that enough, or show enough gratitude to people who have done kind things for you! Now I love my blueprint stamps (no surprise there!) and I thought paired with a simple thanks sentiment and some basic distress ink techniques and a bit of rock candy crackle, I could have a unique card ready to help me express my gratitude.

Candy's thoughts turned to giving thanks and giving little gifts when she created this practical yet inexpensive little note pad.  It's a simple little expression of gratitude that can also be used as a favor at your Thanksgiving dinner table.

For this challenge, I was inspired to create something that is useful yet didn't take a long time to make.  Tim Holtz' Matchbook Set (the larger one) is the perfect size to create a note pad.  I cut two covers from Tim Holtz' vintage Thanksgiving paper in his Seasonal Paper Stash.  Queen's Gold Embossing Powder adds a lot of shimmer to edges.  The Mini Tattered Leaves and Tattered Pine Cones kissed with Paprika and Platinum Stickles are the perfect adornments to create a festive cover.  You can either attach Post It Notes to the interior, or do as I have done and create your own note pad using Kraft Paper and 1/2" Scor Tape.
 
 
Tracy rarely makes thank you cards so this week it was time to put that right and create a thank you card in preparation for the holiday season.
I am really loving the Pop 'n' Cuts at the moment and the Sizzix 3-D Thanks Phrase Pop 'n' Cuts was the inspiration for my piece this week. I love the dimension and the fun element these give to your cards, giving a little more interest to the inside of a card, something we often forget. My cheery flowers were created using Wendy Vecchi's 3 Fresh Flowers Stencil along with rusty hinge, fired brick and peeled paint Distress Inks. To give a little more interest and dimension I have added a Maya Road vintage wood feathered friend along with a few small flowers cut using the Tattered Florals die. You can see more floral delights on the front of my card too!


Thank-you cards are a must have in Trace's card stash!

What I love about making Thank-you cards is that they really can be in any style, and easily custom made just to fit the recipients style and colour preference. I was suffering from ink playing withdrawal, so I knew I had to pull out my Tim Holtz Distress Stains and make my own background papers. After making the two different coloured papers, I over stamped each with two of my favorite Impression Obsession backgrounds stamps. For the top pink panel I used Sm. Quatrefoil, and for the green lower panel I used Tiny Flowers. I had so much fun making the distressed flowers, I started with Tim Holtz Idea-ology grunge paper and coated it with Tim Holtz Crackle Paint in colour picket fence. After it was dry I added a few layers of tattered rose Tim Holtz Distress stain.


Sandra Mouwen is really thankful for all the friends she made this last year, during her creative journey.
I've been papercrafting for a little over a year now and I really want to thank everybody who I've met throughout my crafting adventure! And I'm also very thankful to be on this amazingly talented design team as well!  I started out making a masterboard out of Watercolor paper and misted it with different Dylusions Sprays. To create some texture I sprayed the mini Chevron, mini Punchinella and Luscious Leaves stencils with some water. I made a pattern with the Thank you Words stamps. And the rosette is the smallest of the Mini Rosettes Decorative Strip.
 

This week's challenge was the perfect opportunity for Ashli to reflect on all that she is thankful for. 
I have a special scrapbook that I keep just for myself. It contains silly little layouts about my love of coffee, to more serious layouts about letting go. For this week's theme, I wanted to create a layout with stream of conscious journaling containing all that I am thankful for in my life. The warm colors and cozy feel of the Ready Set Go collection by Amy Tangerine were perfect for this theme. After layering up some strips of paper and stitching them down, some Pink Paislee Wood Shop Alphabets were added. With just a few other little embellishments dotted around, I was left with plenty of space for my journaling. I love having this documented in my album and think I might just have to make this an annual event!
 

Anna-Karin created a little suitcase filled with inked and stamped thank you cards to give as a gift.
I recently read a book where a worn red suitcase played a major role and it made me want to make a vintage red suitcase. I used the great Sizzix Suitcase Bag die (which fits in the Big Shot, it is not a Pro die) and red kraft core cardstock to make the suitcase. It was embellished with stamps from TweetyJill, Graphic45 and Stamper's Anonymous, and with die cut tickets and vintage lace. Inside the suitcase you will find fifteen thank you cards from manila cardstock, coloured with Distress Stains and stamped with many school-themed stamps.
 
 
Suzz was working on her project watching the aftermath of Hurricane Sandy which made her very thankful for all the basic comforts of Home.

The base for my project is a set of chipboard banners.  I painted the banners with acrylic apint and added spray ink over the surface.  The Darkroom Door Home Sweet Home Set seemed the perfect set to reflect my thoughts.  I added some sweet Maya Road Wood Bingo Motifs and Studio Calico Wood Veneer Birds as accents.

 
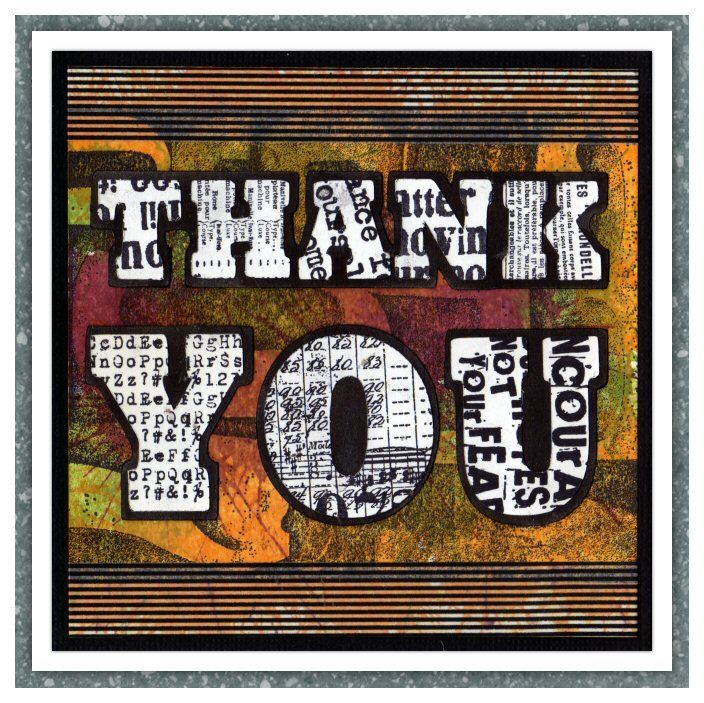
Dan used a bold typographical design to add punch to his thank you card.
When I planned this card in my head, I was going to colour the lettering, but once I started I decided that it would have much more impact if the lettering was in stark black and white against the richly coloured background.  I cut the lettering and the underlining shadow layer on my Cricut machine, then stamped the letters with images from the Going Somewhere, Dance Card and Steampunk sets.  The background is from the The Countdown set and colour was courtesy of a range of Distress Stains.


Terry really loves hearts....and sure loves her friends, so she made a THANK YOU Soap Chain 
I was sitting at my table and was thinking about a special friend of mine and then it hit me I knew that I wanted to make a Heartsy Soap Chain. It even smells so nice with the heart soaps on it. I played around with lots of hearts and the background is made with distress stains, distress inks and crackle as well to give it a nice crackled surface. For a bit of a romantic look I placed the lace and the pearls in between the hearts. I am not only loving hearts but the people who know me well all know that I am loving Wendy's butterflies, Just flutterby Butterfly and Just Fly, they are amazing, so I just had to place them onto the Soap Chain. They have different colors then I usually work with but they do fit right in don't you think? And last but not least I placed an important sentiment at the bottom of the chain and it says, thank you for being a great friend.


Sarah doesn't normally set fire to her stash, but it was the perfect frame for her big thanks!
Sometimes you just want to say Thank you in a very big way so I was looking for a bold design for my thank you card. I seem to be in a masculine mood again this week and reached for my Grungeboard letters, Blocks and Destinations Paper Stash and, um, yes, set it alight! I did go for a torn look at first,  but it wasn't quite right so I took the plunge and tried a touch of real fire. I love the stripes on this paper and only needed a little stamping from the Mixed Media Dots and then finished I off with a fabulous Word Band.

I encourage you to check out each of the design team member's blogs for more photos, supply lists, and more. Simply click on their name (above the photo of their project) to visit their blog.

Now that we've shared the team creations - we're ready to see yours! As always, Simon Says Stamp is giving away a $50 gift voucher that will go to a random entry chosen by Random Generator. The challenge will close at 11:59pm Eastern time on Sunday, November 25th and the winner will be announced during the following week. To qualify all you need to do is create a new project that ties in (in any way!) with our theme and post it, along with a link back to this challenge, and add a link here.
For the full rules, read the "challenge rules" posted in the side-bar here on our blog.


Friday, November 16, 2012

Inspiration Francaise winners!

I'd like to thank Simon Says Stamp for another great chance to win a $50 voucher!!

The lucky (randomly drawn) winner for the Inspiration Francaise challenge is...
 
36 Annie G

Please claim your prize within the next two weeks by emailing May with your details. Now let's talk about the top 3 projects as chosen by the Stamp & Show design team. This was such a hard week- it was a really tight battle and let me tell you I wish this was a top 10, or 20 maybe! Ah, but it is always the top three, and this week the honors go to: 

8 lisa swift
28 Colleen Dietrich
43 Xenia

Be sure to visit their blogs and check out their amazing entries. So inspiring! Congratulations to each of you on a challenge well done! Please email May for the Top 3 Blinkie.
 
I'd like to thank everyone who took part in the challenge. It is always a joy to see what you create. I'd also like to say thank you again to Simon Says Stamp for their generosity - each week we give away a $50 gift voucher to the shop that you can use to buy all kinds of fabulous stamps, inks, and paper crafting supplies. Remember - you just need to enter the challenge each week to be entered into the drawing!

Monday, November 12, 2012

Challenge: stamp without ink!

Is the challenge this week really to stamp without ink? The answer, is yes! For the purposes of this challenge I’m talking about traditional ink pads - so what could you stamp with? I like to use mist (put some on a slick surface, then tap the stamp through it and 'stamp'!), acrylic paint or paint dabbers, marker pens, distress markers, distress stains, perfect medium with perfect pearls, and also using embossing inks and powders.
   
Of course anything else you can think of is welcome too. I’m including embossing ink in here as not traditional ink pad, because if you’re like me you don’t emboss nearly enough. The key is to step outside those lovely normal ink pads we all know and love and mix it up! Before you get creating, here are more ideas from our design team!

Paint Dabbers were the obvious choice for Tracy this week, inspiring her to create an inky seasonal canvas.
I always find it a challenge to work on a larger scale and without using my trusty Distress Inks too, so this week was really thinking outside the box for me. My inky canvas has been coloured with Dylusions Ink Sprays Postbox Red, Cut Grass and Melted Chocolate, and has even been showered with a little rain to give me those random splatters. Tim's background stamp from the Season's Silhouettes stamp set came to my aid for the background stamping using Paint Dabbers Snow Cap and Pitch Black. I think this is destined to be my son's alternative Christmas card.

 
Candy tried something she's never done before; stamping with bleach, to create the background for her beautiful vintage pocket tag.

I've stamped with paint and Perfect Pearls before but I'd never tried bleach.  So, that was my inspiration this week in creating this pocket tag.  The background of the #8 Manila Tag was heavily distressed with Wild Honey, Squeezed Lemonade and Evergreen Bough Distress Inks.  The Kaisercraft Tigerlilly Butterflies stamped with bleach create such a beautiful contrast. Artistic Outpost's Melange provided most of the lovely vintage images that were colorized with the same Distress Inks and a Small Sakura Water Brush.


Sandra Mouwen finally got her stamping with paint technique down.
It was quite a challenge for me to stamp without ink, but a great opportunity for me to practice some techniques, like stamping with paint. I've tried it several times before, but now I've got the hang of it. Finally! It's all about how and how much paint you apply to the stamp. I had so much fun practicing in my art journal. I've stamped with Lettuce, Pool and Espresso Paint Dabbers. I also stamped the text stamp of the Papillon stamp set with VersaMark and Perfect Pearls Perfect Gold and Sour Apple. Love that technique! It gives such nice clean prints.


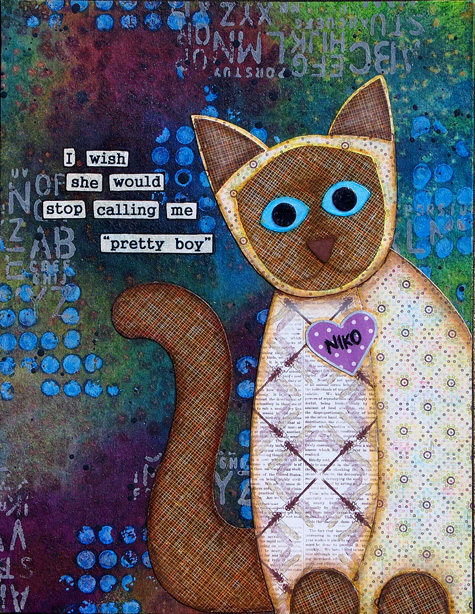
Stamping without ink is something Trace seldom does.
I choose to stamp with paint for this mixed media board. I find that using stamps that have larger solid areas like this Dylusions basic backgrounds stamp set from Ranger and my Claudine Hellmuth paints worked really well for me. Stamped images using paint would be as perfect as ink, but that is perrrfect for this board! My ragdoll kitten "Niko" was paper pieced using different patterned papers from Basic Grey 6X6 pad Konnichiwa and Authentique 6X6 Lively collection. LOVE these paper packs!


Ashli wanted to challenge herself this week, so out came the embossing powders!
Stamping with paint is one of my most favorite techniques. So, that wouldn't have been much of a challenge would it? I have a drawer full of lovely embossing powders. I never use them. Time to step outside my comfort zone and give that a go! After stamping on some dots with my Hero Arts Cling Dots Stamp, I used teal, gold and white embossing powders to accent my lovely Basic Grey Plumeria paper. Once my photo and embellishments were layered on, I wanted a little more sparkle. A scrap sheet of paper embossed with gold and cut into strips sure did do the trick!
 
 
Suzz  loves to use sprays and mists and stamping with them can give a messy but lovely effect:
I knew I wanted to ink up a stamp using the Dylusion Ink Sprays as I haven't inked up a stamp with these lovely bright colors.  This image actually is stamped twice with a shadow effect using the Vibrant Turquoise and Lemon Zest Dylusion Ink Sprays.   I am in love with the  Stampers Anonymous - Classics #1 dragonfly stamp and couldn't wait to showcase it in a beautiful bright color palette. I added a bit of tulle, some gems, and Stampendous Glitter Kit Treasures - Silver to sparkle up my card.   This card will be sent off to my niece for her birthday!

 
Anna-Karin loves stamping in any form and made three ATCs using different techniques:
I wanted to ink up this new Stamper's Anonymous Classics #3 set and stamped the images on manila cardstock with white paint, since I love the look of paint resist. The ATCs were inked with distress inks and to add another layer of stamping, I stamped with Versamark and brushed with three colours of Perfect Pearls, which gives such gorgeous shine to a project. Sticky back canvas was adhered to grungeboard and the bird, heart and butterfly were die cut and inked. The cards were finished with some lovely quotes about flying and dreaming.
 

Since it won't take that long before Christmas is here Terry thought of making a Christmas Bag.
I had so much fun making this Christmas Bag.  I was playing around with the Blue and White Acrylic paint and worked with the Silhouettes from Tim Holtz onto the painted background. The white embossing powder really gave the Snowflakes more effect and the 25 has some Crackle on top, now I think they pop out of the bag, don't you think? On top I placed a gem and to finish I wrapped a rope around it. You can make this cute bag quickly whenever you want something for a special person.
 

Dan stamped snowflakes in water and gesso while making this ornament for his Christmas tree.
I've decided I want Christmas this year to have more of a "hand-made" feel to it, so I've started by making some decorations for my Christmas tree using some blank beer mats I had lying around.  I really like the nutcracker on the Christmas Blueprint stamp set, I think I'll also use him on the home-made crackers I'm going to make for the family table.  He doesn't usually have eyes and a mouth, I added those with a black Distress Marker. Other products I used included the Mini Holidays 2 stamp set, Distress ink pads in Broken China and Faded Jeans and lots of Rock Candy Stickles.

 
Sarah wanted to create a male motivational card and found her inspiration in the Autumn mood and tones of October.
 A male card can be difficult, especially a motivational one, but these Tattered Leaves were the perfect surround to the great sentiment. I wanted to add some extra detail and contrast to my layered card and thought that this foliage stamp from Tim's Floral Tattoo set would look great stamped in Gesso. I like using segments of stamps for a touch of extra wording and interest so I partially stamped the leaves. I was almost done but things felt a little bare, so call in the rustic string, eyelets and a Philosophy tag to finish things off.
 
 
I encourage you to check out each of the design team member's blogs for more photos, supply lists, and more. Simply click on their name (above the photo of their project) to visit their blog.

Now that we've shared the team creations - we're ready to see yours! As always, Simon Says Stamp is giving away a $50 gift voucher that will go to a random entry chosen by Random Generator. The challenge will close at 11:59pm Eastern time on Sunday, November 18th and the winner will be announced during the following week. To qualify all you need to do is create a new project that ties in (in any way!) with our theme and post it, along with a link back to this challenge, and add a link here.
For the full rules, read the "challenge rules" posted in the side-bar here on our blog.


Friday, November 9, 2012

winners: pearl challenge

I'd like to thank Simon Says Stamp for another great chance to win a $50 voucher!!

The lucky (randomly drawn) winner for the Just Add Pearl challenge is...
 
88 Donna Gibson

Please claim your prize within the next two weeks by emailing May with your details. Now let's talk about the top 3 projects as chosen by the Stamp & Show design team. This week the honors go to:
 
36 Kaz
38 Chris Dark
85 Hettie

Be sure to visit their blogs and check out their amazing entries. So inspiring! Congratulations to each of you on a challenge well done! Please email May for the Top 3 Blinkie.
 
I'd like to thank everyone who took part in the challenge. It is always a joy to see what you create. I'd also like to say thank you again to Simon Says Stamp for their generosity - each week we give away a $50 gift voucher to the shop that you can use to buy all kinds of fabulous stamps, inks, and paper crafting supplies. Remember - you just need to enter the challenge each week to be entered into the drawing!

Monday, November 5, 2012

Challenge: Inspiration Francaise

    Bonjour my crafting friends. Whether it is some French script, a fleur de lis, or an element with the Eiffel tower on it, most likely you have some French-spiration somewhere in your crafting stash. Perhaps it is a Paris stamp, a map paper, or maybe you’d like to dress up an old champagne bottle. Maybe a favorite movie of yours is set in France and you utilize that as inspiration - c'est la vie.
 
    Wherever you find it, I look forward to seeing what you create this week as I’m such a fan of French food from macarons to champagne, of vintage French style, and of course, my favorite accessories in 2012 have been French General products! Viva la France! Let’s see what you’ve come up with.


Sarah immediately started quoting lots of cliché phrases in a rather bad French accent when she saw this challenge theme and that led to the inspiration for her quirky card.
I just couldn't resist a bit of Ooh la la and thought I'd also use the colours of the French flag too! I just love stamping in Archival Ink onto white card and seeing a fresh, crisp image appear so I grabbed my Wendy "It's Face Art" stamp set and my ink pads. I think Ranger's Vermillion and Cobalt Archival inks are just the right tones for the French look. My 'go to' flutterby, the Just Fly butterfly stamp, added a dimensional touch to the card as well as fun headdresses for my flying damsels.


For Tracy inspiration comes in the form of an altered French sardine tin.
My husband helped the cause this week, eating plenty of sardines for my creative endeavours. Inspiration began with the PARIS film collage stamp, a perfect backdrop for my tin. Colouring my tin was made so easy with the use of the Vintaj Patina Inks Weathered Copper, giving wonderful coverage. A little ageing was needed so StazOn timber brown and Alcohol Inks ginger and rust came to the rescue. This piece has pride of place in my craft room.
 

Ashli didn't have much of a plan when she started playing with Jolee's French General Metal Ribbons, but she ended up with a mini mirror home decor piece that is so very French inspired!
I must admit, this week's challenge had me a bit stumped at first. The only experience I have with anything French is almost failing my required language course in grade school. But, as soon as I saw Jolee's French General Metal Ribbons, I knew they would jump start my inspiration. With the banners by my side, I grabbed my stencils, alcohol inks, mists, and Stickles in coordinating colors and went to town on my canvas. Then, with the sweet little girl chipboard piece from Crate Paper and a re-purposed mirror, this home decor piece for my three daughters came together. When they glance in the mirror, they will remember... "Tu Es Jolie." You Are Beautiful!


Terry made a French Decoration Frame and had lots of fun by making it.
When I heard of the French Challenge Theme I immediately thought of a small frame that I wanted to alter. When I think of French I think of the Papillon Stampset of Tim Holtz, the background was made with lots of French words and sprayed on with Glimmermist. I worked on the butterflies with Embossing powder and Utee. The frame was worked on with Tissue Tape and on top I played with Distress Stains such as Walnut Stain and Fired Brick and yep some Crackle. And to finish my French piece I placed the Tim Holtz corners and the Wendy Wings.


Sandra Mouwen adores Paris. She has a great love for the Eiffel tower.
I went to Paris two months ago and I've had the best time there. A trip to Paris isn't a real Paris trip unless you've been to the Eiffel tower. A big wish of mine is to climb it one day! For my Paris inspired piece, I made a little canvas and covered it with a napkin I picked up on another trip. I used lots of Glue n' Seal to adhere it down. I surrounded myself with lots of texture stamps and began stamping with KaiserCraft Script, KaiserCraft Numbers and the dots from Bitty Grunge. I also used lots of Paint Dabbers along the way. The Parisian lady I draw/painted is inspired by Christy Tomlinsons art. I really like her style!

When Candy thinks of France, she thinks of shabby chic, the Eiffel Tower, Moulin Rouge and can can girls.  That was her inspiration for creating this tres chic matchbox dresser.
I took French in high school but was more years ago than I care to remember.  However, I have always loved French things; their art, their historic landmarks, their food and their shabby chic style.  That inspired me to create this very shabby chic dresser using 10 small matchboxes.  The dresser is covered in those beautiful papers from Prima's Almanac 6x6 paper pad. The "CHIC" bunting was created from Tim Holtz' Mini Scallops On The Edge die cut and covered in Rock Candy Stickles for that extra vintage feeling.  Every side of the chest is embellished with French goodness, including a Tim Holtz Paris Collage scene embossed with Black and Copper Embossing Powders.

 
Trace  has always had wonderful French speaking girlfriends....Bonjour!!
Living in the bilingual country of Canada, I have had the honor of having many French speaking girlfriends throughout my life. I was inspired by them to make this France inspired manila tag. When I think of France I think of Regal, so I knew that aged mahogany, fired brick, wild honey, and dusty concord would be the perfect Tim Holtz Distress Stains to use when colouring in the Tim Holtz Papillon stamped and embossed image...they are also one of my friends favorite colours...Perfect! I can't wait to give it to her!
 
 
I (May) was inspired to use some of my French General goodies as I sat down to decorate this little notebook.
I am in need of a good holiday notebook, and I wanted to use this challenge to use some of the French General goodies in my stash as well. Using some product packaging as a base on my cover, as well as the Tim Holtz papillon stamp as well, my 'inspiration francaise' came together in no time! Now I have a spot for noel notes, and isn't it tres chic?
 
 
Suzz decided to create her own Eiffel Tower using her version of tiles:
I have always been fascinated with the Eiffel Tower and the beautiful architecture.  I decided to create my own mini tiles by stamping on poster board.  The tiles use a variety of images from the Stampendous Charm Collection , Artistic Outpost - Paris Exposition,  Stampers Anonymous - Attic Treasures and Hero Arts - Rectangle Doily.  I tried several combinations of tiles shapes to form my tower.  I had to get approval from my in-house architects.   I attached the tiles to a background of layered tissue paper and corrugated cardboard. This project was quickly snatched up by my youngest daughter and is hanging in her room.  High praise indeed!


Anna-Karin made a French inspired tag, and you can almost smell the lavender when you look at it:
I spent a few nights in France long ago while camping with my family, and one of my memories from that trip is the many lavender plants that we saw. For my tag, I made lavender flowers with Flower Soft and florist wires. The background is stamped with Stamper’s Anonymous Tim Holtz French Market Place and Moulin Rouge stamps, and inked with red and purple shades of Distress Ink. A little tag, Eiffel Tower stamp, hanger clip, dyed crinkle ribbon and banner gave the last touches to the tag.

 
Dan took advantage of Tim Holtz's french "Cirque" stamp to revisit one of the recurring themes in his work, notions of identity and disguise.
Those of you who are familiar with my blog will know that I occasionally play around with ideas of  masks and hidden identities.  The Mona Lisa, already a figure surround by mystery, was my starting point.  I used the Mona from Tim Holtz's Artistic Collages stamp set and accented it with images from the I See Paris and The Big Top sets.  The ghosted postal frank mark was created using the Versamark resist technique and there's a little piece of Tattered Time cardstock in there somewhere.


I encourage you to check out each of the design team member's blogs for more photos, supply lists, and more. Simply click on their name (above the photo of their project) to visit their blog.

Now that we've shared the team creations - we're ready to see yours! As always, Simon Says Stamp is giving away a $50 gift voucher that will go to a random entry chosen by Random Generator. The challenge will close at 11:59pm Eastern time on Sunday, November 11th and the winner will be announced during the following week. To qualify all you need to do is create a new project that ties in (in any way!) with our theme and post it, along with a link back to this challenge, and add a link here.
For the full rules, read the "challenge rules" posted in the side-bar here on our blog.