Monday, April 15, 2013

Challenge: Background

It is no secret that I am an avid collector, lover, and user of background stamps. Beyond using them for backgrounds, I use parts of them to edge projects, with paint to add some texture and contrast to my mixed media pieces, to decorate punched or die cut shapes, to add some interest and perhaps embossing onto alphabet stickers - and so very much more.

Your challenge this week is to use a background stamp in some way, shape, or form on a project. You could also use any stamp you’ve got to create a clever background design as well - the possibilities are endless!
 
Anna-Karin loves background stamps because they are so very versatile.
I wanted to use lots of background stamps on my card and ended up using twenty different stamps, most from Hero Arts. Small squares were die cut from a variety of inked and watercoloured scrap papers. I stamped each one with a different background stamp using a slightly darker Distress Ink, for a tone-on-tone effect. Maya Road canvas butterflies flutter over the card and I used the Simon Says Stamp exclusive Mini Hearts Set to die cut the tiny hearts. The sentiment was stamped with Simon Says Stamp Music 2 My Ears set.
 
 
Sarah was in a freestyle mood and thought it was the ideal time to experiment with her new Distress Paints...
I love playing around with using just sections of my larger stamps to create new images and today I did that with both Tim's Classic #5 and Grunge Alphabet sets. I love how the eyes just fade away... I had great fun playing with the Distress Paints, letting them run and swirl on Ranger Specialty Stamping Paper - yet still retaining such vivid colours! You will love them! I experimented with the Alphabet stamp on scrap paper first to determine now much I needed for contrast in the background. I was tempted to go for more stamping but I liked the watery detail in the paints and decided it was a butterfly I was missing for that extra dimension and focus.

Candy really enjoyed creating different stamped backgrounds for her vintage journal/album.
Creating my own design for this vintage album/journal was so much fun. The interior pages are all made with Tim Holtz' new set of Cabinet Cards. I love Tim Holtz' new Picture Wheel die cut and I think it worked perfectly with his Distress Doily On The Edge die.  I used Tim Holtz' larger Fabulous Flourish stamp to create my first stamped background behind the very vintage looking Picture Wheel.  The second background stamped is the striped album cover using Vermillion Archival Ink on cream cardstock and Wendy Vecchi's fabulous stripe background stamp from her new Busy Making Art stamp set. Just wait until you see the finished vintage cover now hidden behind the flap!

Background stamps make up the majority of Trace's stamp stash!
I could not live without my background stamps! This Impression-Obsession CC027 Flourishes rubber cling stamp is probably one of the most used stamps in my possession. It is so versatile, I use it on so many different projects of mine. What I really like about this flourish stamp is that although it is very pretty, it is also strong enough to be paired with other elements such these pretty Simon Says Stamp Fresh Daisies dies; and a busy handmade background like the one I created with watercolour paper, water, and Rangers Alcohol inks.

Tracy dusted off the wallpaper background stamp from the Stampers Anonymous Wallpaper and Wood stamp set to create a wonderful backdrop to showcase all her sewing ephemera.
I have so many stamps in my stamp collection that this wallpaper background stamp has been neglected for some time, however, it took the leading role in this sewing themed piece, embossed with clear embossing powder and coloured with barn door Distress Ink. The Sewing Blueprint stamp set and the Mini Blueprints 3 accessorize my accordion perfectly along with sewing embellishments from Maya Road.


Ashli decided to use one of her new favorite stamp sets to create a custom background for her page.
I am so in love with the Simon Says Stamp Exclusive Plenty of Hearts Stamp and Die Cut set! Instead of using each little heart individually, I decided to just leave them on their packaging, ink them up, and create my background. Custom stamp = custom paper. Love that. Once all my stamping was done, I put those die cuts to good use to create some embellishments. A Crate Paper Heart Chipboard Piece adds the perfect spot of pink while some Amy Tangerine Yes Please Stickers help to pull it all together. To finish things off, I simply journaled with my beloved Signo Pen and added some Maggie Holmes Thickers. A page full of custom patterns, embellishments, and heart? Captivating!
 

Dan decided to re-examine a well-known saying from the past while also indulging his love of background stamps...
I love this guy, don't you think he looks just like a detective from the Pinkerton Detective Agency? When I started on this tag, I was going aiming for a representation of "behind every great man is a great woman" but as I worked I got to thinking that was a bit sexist and old fashioned, after all, why should she be in the background if she's as great as he's supposed to be? My first thought was to make it "Behind every great woman..." but that still kinda gave him more of the credit than I wanted to give him. Finally I came up with it - can you guess how I finished off my amended saying? I used the Darkroom Door Woodgrain stamp but it was almost the Corrugated Iron, I love that one too!

It is for sure no secret that Anita loves stamps, and using them in wild ways!
This was such a fun challenge, and I am so glad that there was a certain friend having a birthday, who would love and appreciate this wild western themed card! I salvaged this kraft portfolio card from an invitation that had expired, and I took it down to it's bare bones and began patterning a whole background that would leave this card needing nothing else but a fastener. I used Tim's whole Wild West Stamp Set from Stamper's Anonymous, along with Unity Stamp's Brave Boots as the main images of the background, and Wendy's Art For You background.

I (May) used my stamp set to make a few background details on this card.
I love finding ways to make the most of a stamp set, and with this set by Tim Holtz I managed to make two different backgrounds. My favorite part about this card (aside from the short supply list) is how I used the flag as a background with distress stain, but in fact the stamped "London" was the first thing done on that piece. It reminds me to play more with my stamps, and that sometimes the background can be the last thing you work on.

 
Suzz loves using the background stamps to create texture behind her main image.
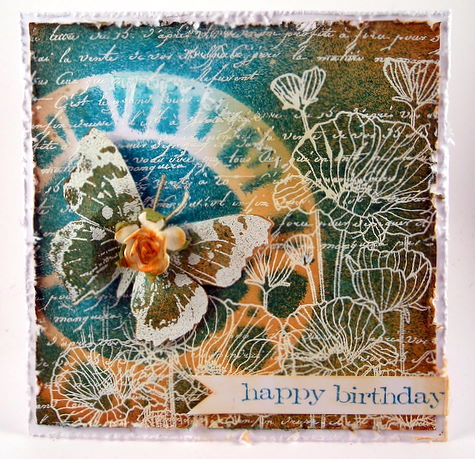
One of my favorite things to do is to add background stamps behind other images. I love the effect of the text behind other images which adds a depth to the project. I used the Hero Arts Old French Writing to the background with white embossing powder.  I then brought in the beautiful blossoms from Hero Arts on the right side to bring the eye up and across the background.  I finished the design with the lovely Stampendous butterfly as the main focal image.  

Although Sandra Mouwen loves the background stamps she has, she wanted to make her own.
I wanted to try something different and made my own background stamp. It's so easy, fast, and you only need three things to do it. Darice Foam Sheet, an object you want the imprint of, in my case I used the Gears Embossing Folder and a Heat tool. To bring the Remnants Hot Air Balloon stamp to the foreground, I masked it before I stamped with my own background stamp. I so love the new Label Letters, I can use them on any project! The big letters are from the Word Play die, also a favorite of mine.

 
There are so many ways to be inspired by this challenge, and so many directions to run with it! For more inspiration click on our design team's blog links so you can see more photos (and full supply lists) for their projects.

 
As always, Simon Says Stamp is giving away a $50 gift voucher that will go to a random entry chosen by Random Generator. To qualify all you need to do is create a new project that ties in (in any way!) with our theme and post it, along with a link back to this challenge, and add a link here. This challenge will end at 11:59pm on Sunday  April 21st EST.

For the full rules, read the "challenge rules" posted in the side-bar here on our blog.


Friday, April 12, 2013

Winners: Anything goes challenge

I'd like to thank Simon Says Stamp for another great chance to win a $50 voucher!!

The lucky (randomly drawn) winner for the anything goes challenge is...

347  Linda SS

Please claim your prize within the next two weeks by emailing May . Now let's talk about the top 3 projects as chosen by the Stamp & Show design team.  This week we had a RECORD number of entries and so it was hard to narrow things down to just three. This week, our top 3 honors go to:

 139  Monique
194 Brenda Brown
261 kaylou

Be sure to visit their blogs and check out their amazing entries. So inspiring! Congratulations to each of you on a challenge well done! Please email May for the Top 3 Blinkie.
 
I'd like to thank everyone who took part in the challenge. It is always a joy to see what you create. I'd also like to say thank you again to Simon Says Stamp for their generosity - each week we give away a $50 gift voucher to the shop that you can use to buy all kinds of fabulous stamps, inks, and paper crafting supplies. Remember - you just need to enter the challenge each week to be entered into the drawing!

Monday, April 8, 2013

Challenge: Fly

Feathers are showing up in the Simon Says Stamp shop in addition to the usual lovely birds that love to flock onto craft projects of all sizes and styles. From charms to paper accents, stamps to paper - this week we’re taking flight!
 
It is up to you if you choose to jump onto the feather trend, put a bird on it, or perhaps take the challenge more loosely and take a soaring approach - perhaps just blue skies or talk about what makes you feel like you’re on cloud nine in your art journal, or even use a metal bird (aka an airplane!) on your project. From butterflies to angel wings - whatever approach you take - we can’t wait to see how you spread your wings and fly creatively this week.
 
Anita often has dreams of being able to fly across the world, but for this challenge she choose to make a bird who can hardly fly at all , not even if you gave him 10 chances.
Ah the peacock...probably the most gorgeous bird in the land, the male that is. He can't fly far, but the beauty of his feathers make up for any self-esteem problems he may have. I just love the deep, beautiful jewel toned colors in the peacock's feathers, and I tried to mimic those tones here, but as you can see this bird is sort of strange looking. That is because I used all 10 of the numbers in the Tim Holtz Numeric Stamp Set from Stamper's Anonymous to create the body of this peacock. The wing of the peacock is from Tim's Mini Ornates Stamp Set, and the Vintage Peacock Feather images are from Maya Road.

Tracy is flying on dragonfly wings this week to create her vintage cabinet card.
My inspiration this week was simply to use another stamp set that I have not yet inked up and as I set myself a challenge at the beginning of the year to use all my stamps, I am forging ahead and sticking with my personal challenge. I really wanted a different shape to showcase the dragonfly from the Stampers Anonymous Classics 1 stamp set and the Vintage Cabinet Card die really appealed this week. I am also really drawn to mowed lawn and salty ocean Distress Inks at the moment, they are my all time favourite!

Candy's love of Spring and birds was her inspiration for this week's challenge.
"Fly" was the perfect theme to create this sweet, shabby chic paper mache book paying homage to our feathered friends. I adore Emily Dickinson's sentiment from Artistic Outposts' Quotable Quotes.  It truly was my inspiration for this piece. The book is washed with Claudine Hellmuth's Studio Classic Teal Acrylic Paint followed by a wash of her Traditional Tan.  Heavily textured "pages", meant to look tattered and worn, are created using Wendy Vecchi's wonderful new Embossing Paste. In my tutorial, I will show you how to create this book, including the addition of your own little drawers from chipboard and Tim Holtz' Hitch Fasteners as knobs. 7 Gypsies Conservatory 8x8 Paper Pad were the perfect complimentary papers for this piece. 

Trace just had to use her favorite flying creature for this week's challenge.
Butterflies are definitely one of my favorite creatures, so I just had to use them for this week's theme. The Tim Holtz Papillon rubber stamp set is so fabulous, it actually gives you seven different butterflies to choose from as well as two background stamps! You might recognize this background as another one of my mop up tags, but this time I embellished it with The Crafter's Workshop Mini Peony stencil and Wendy Vecchi Embossing Paste. A coat of Distress Crackle Paint was applied and left to dry overnight, and wanted a bit more subdued look so I applied Tim Holtz Distress Picket Fence paint all over the tag. I love how it pools in the concave bits of crackle.
 
Dan took some winged things and gave wings to something else to create his vivid card.
This week I present you with this flying trio. I'm particularly happy with the way the red wings turned out, they were embossed with white embossing powder and then coloured with a crimson promarker - it instantly looked like I used red embossing powder, who knew? Well, ok, you probably did, but I didn't, but better late than never, right? Plus, now it's like I have hundreds of colours of embossing powder at my fingertips, limited only by the choice of promarkers! I used several stamps and sets for this, the cupid and splatter background both had their first outing out of the packaging. The man from the Winged Things 2 set is one of my favourite stamps and those of you who are familiar with my blog will have seen him more than once. I gave him a rest today and used the little boy from the same set instead.

Ashli's flock of three, all snuggled up, gave her the perfect excuse to get scrappy and "put a bird on it!"
The feather and bird trend is just so fun, isn't it? I have played around with it a bit here and there, but decided this was my week to really go for it! After layering up some of my favorite Washi Tapes, I simply adhered some feathers to my page to act as a little cushion for my photo flap. A little strip of washi creates a photo flap that also lifts up to show my ephemera and journaling. With that all set, I grabbed my Baby Bird Sizzix Die and some Grunge Board. A title and some Doodle Twine complete this page all about my little birdies.

Sandra Mouwen loves her some wings, she wishes she could fly all around the world.

When I think of flying, I think of wings. And I almost automatically reach for my favorite wings stamp, but I could stop myself and came up with something different. I really like the zipper look, and I made this dragon fly with it. It's so easy to do, but I had to become friendly again with my glue gun, and that was the hard part. For the background I used a scrap piece of Prima Marketing Zephyr Paper. Stamped with one of my new favorite stamps 36 of KaiserCraft. I'm so liking the Sun Kiss Flowers too. The little hearts are cut out with the exclusive Mini Hearts Die of Simon Says Stamp.

Suzz was thrilled to hear the challenge was all about flying as she loves the butterflies, birds, and dragonflies.
This challenge is perfect timing for me as the Robin's have just started showing up again which is a sure sign of spring.  I decided to create a little bit of spring for inside the house by using  the Weathered Clock die cut from Sizzix. I die cut three pieces of chipboard to create a frame.  The colors and the embossing were inspired by the sweet Prima Robins Nest. I added the Stampendous Bluebirds to my spring project. Hopefully the weather will follow my lead and melt away all the snow.
 
Anna-Karin loves birds, both real ones and handmade ones, and made three different happy little birds this week:
I love trying to spot birds flying by as I walk, or capture them on a photo. For this week, I decided to make three birds that happily fly around in my study. To make the birds, I used the fabulous Sizzix Bird die by Eileen Hull. One of them is a steampunky dry embossed metal bird with a Vintaj piece hanging from a chain and of course some gears. The middle bird is a text tissue bird with shiny kraft glassine wings and a word stick sentiment. The third bird was made with stencils, Dylusion mists, Vintaj star eyes and more Idea-ology embellishments.

Despite the snow, Sarah thought it was supposed to be Spring and so she decided on some bright and inky mini canvases with her favourite Wendy Vecchi butterfly...
I have a box at home full of "stuff I could use someday" and when I looked in it this week I was shocked at the amount of canvases I had accumulated over the years. I saw these three little ones and thought it would be great to have some mini inky fun. I played around with my Dylusions Inks and stencils as well as gesso and bottle tops! I wanted some bold lettering to show up against the backgrounds and just love my Worn Text Stamps. I'm still not out on whether they should be hung vertically or horizontally. Maybe I can change them around each week!

I (May) was thinking about dreams, plans that I hope will take off, and so I decided why not make a journal for these thoughts?
Sometimes the best way to help dreams take flight is to write them down. With this week's challenge in mind, I also added my favorite Hero Arts bird stamp to my cover. I love how I was able to layer both color and texture with my distress paints and that I was able to use my newest background stamp to add even more heart to this simple design. Armed with my customized notebook, now all that is left to do is start writing!
  

There are so many ways to be inspired by this challenge, and so many directions to run with it! For more inspiration click on our design team's blog links so you can see more photos (and full supply lists) for their projects.
 
As always, Simon Says Stamp is giving away a $50 gift voucher that will go to a random entry chosen by Random Generator. To qualify all you need to do is create a new project that ties in (in any way!) with our theme and post it, along with a link back to this challenge, and add a link here. This challenge will end at 11:59pm on Sunday April 14th EST.

For the full rules, read the "challenge rules" posted in the side-bar here on our blog.


Friday, April 5, 2013

winners: Quotable

Another amazing week - and from movie quotes to sentiment stamps WOW. I'm so inspired by all of the quotable entries we received. This is such an amazing community of crafters, and every week I'm inspired by all that is shared here. So THANK YOU for entering the challenge! As a reminder this week is an "anything goes" challenge week so don't forget to enter!

Now, I'd like to thank Simon Says Stamp for another great chance to win a $50 voucher!!

The lucky (randomly drawn) winner for the quotable challenge is...

106 Donna R

Please claim your prize within the next two weeks by emailing May . Now let's talk about the top 3 projects as chosen by the Stamp & Show design team.  This week the honors go to:

36 Monique
68 Annette Green
69 Terry

Be sure to visit their blogs and check out their amazing entries. So inspiring! Congratulations to each of you on a challenge well done! Please email May for the Top 3 Blinkie.
 
I'd like to thank everyone who took part in the challenge. It is always a joy to see what you create. I'd also like to say thank you again to Simon Says Stamp for their generosity - each week we give away a $50 gift voucher to the shop that you can use to buy all kinds of fabulous stamps, inks, and paper crafting supplies. Remember - you just need to enter the challenge each week to be entered into the drawing!

Thursday, April 4, 2013

Distress tag with May

Hi there! This week we're having an "anything goes" kind of week, so be sure to join in the fun (and enter to win!) our challenge this week. Just link your project (or projects!) this week up at the end of our challenge post here.
For my project this week, I'm sharing a tag that I created (quickly too!) featuring Tim Holtz distress paint including the new metallics! Not just that - but I'm sharing how-to with you as well. Since it is anything goes this week, I'm using a paper towel as a key tool to help me get the color results I want from my distress products. I love the results!

First, coat the tag with the distress paint color of your choice, and dry with a heat tool. Then coat generously with a metallic color and blot dry with a paper towel, removing some of the excess. If you want a bit more color, add another thin coat of the base color (broken china in my case) and once again blot it off with a paper towel.

The paper towel is great because it adds texture and I love the final result! Of course, this is just the beginning! Now it is time to add texture.
I do love the new Tim Holtz Compass texture fade - great for a tag! Once I embossed the tag I added ink in black and gathered twigs. 

To add another element to my tag, I stamped "air mail" and colored with distress stains, once again blotting with my paper towel to remove some of the color.
Now that these two elements are complete, it is time for some embellishing and stitching!
I used some of the new Sunrise Sunset mechanicals and chit chat stickers to finish things off - and I love the finished result. My tag looks so aged, and it reminds me to use my paper towels more often with my distress coloring! I hope you've enjoyed my project how-to, and that you'll join in this week's challenge too.

Happy Crafting -

May

Monday, April 1, 2013

April 1: A very strict challenge.

Oh just fooling! How could we do an April Fool’s Day challenge and make it something serious?

No way - we’re totally playing around here this week and absolutely anything goes!


Full on pop of colour was the order of the day for Tracy in her Spring inspired card.
I wanted to jazz things up a little this week with a pop of colour and I was in the mood for FUN so what better way to start than with a few SPLATS created using my Distress Stains broken china and wild honey. An anything goes challenge was my opportunity to have some fun with no rules, although I could not believe how much mess I could make from a few splats! The butterfly from the Easter Blueprint stamp set was perfect for my adding a little more life to my card, flying colours you could say.  The pop of colour adds a touch of spring to this card and I definitely had a spring in my step creating it!


Boy, did this year fly by quickly! It's Christmas again ... April Fool's! Santa is taking to the skies in this Joyful Plane that Candy has created.
Ever since I saw this little beauty on Jim The Gentleman Crafter's blog, I've wanted to make one. With a body constructed from Configurations Box compartments and colored with a Red Pepper Paint Dabber and chipboard wings die cut from Tim Holtz' Artful Dwellings,  this plane really does look and feel like a vintage toy. Ideaology abounds on this sturdy, fun and amazingly easy project. Check out the Faucet Knob engine and steering wheel. Pulley Wheels are down and ready for take off and the and the Game Spinner/Sprocket Gear/Hitch Fastener assemblage is ready to take Santa into the wild blue yonder!
 
 
Sandra Mouwen really agrees on celebrating new beginnings, such as a new house for her best friend!
I find it hilarious that the Chipboard Zepher word is spelled wrong. Perfect for April Fool's Day! Don't you love fresh starts? A new house, a new job or a birth, all wonderful new beginnings! This card is for my best friend as she is at the start of a new beginning. I embossed with the Book Covers embossing folder some Metal Foil and painted it gray mixed with Charcoal Black and Blank Canvas Studio Paint. When it was dry I softly sanded the raised areas with the Snow Burnishing Block, and smeared some Pool Paint Dabber over it. The cute Forest Bird I cut out and inked it with Peacock Feathers and Wild Honey Distress Ink.

 
Dan took the opportunity to celebrate the day by fooling around with some of the newer items in his stash.
Fooling around with new products is the perfect activity for today, right? Even better when that day falls on a "no rules" challenge, freedom to let one's imagination run wild. The mailman recently dropped off the Worn Text and Time Travelers stamp sets as well as the Grunge Font set from Kaisercraft so I was itching to try them out. I had no set aim in mind while working on this card, but having said that, I can't help but think of Victorian theatres when I look at this - don't those bumps along the bottom look a little like rows of theatre seating? No? I guess it's just me then!
 
 
Trace thinks a bit (ok...a lot) of sparkle makes any project fun!
I wanted to try and push the limits of how much sparkle I could add to one small project! I was able to apply quite a few layers and that makes me one happy girl! I knew I could not go wrong by starting with a slightly ugly mop-up manila tag, because it could only get better with sparkle! I have so many sparkle products in my stash, but my "go to" top three must haves are: Tim Holtz Distress Crackle Paint in clear rock candy, Sakura Gelly Roll pens, and Zing silver embossing powder.


Ashli decided to do something pretty simple since anything goes this week...
April Fools!!! Simple? HA! Who am I kidding? You all know I welcome the chance to have no rules and run wild! My inspiration for this week was a product that had me fooled when I ordered it. See that giant tag on my layout? I really had no idea how big it was when I added it to my shopping cart. Yes, it had measurements listed, but I am not very mathematically inclined. Let's just say I was surprised when they came in the mail. After loads of painting, spraying and embossing on several tags, I picked out my favorite of the bunch and used it for my starting point on this layout. Some lovely Amy Tan die cuts and Crate Paper chipboard pieces help tie all of this together.

Even though she doesn't tell jokes very well, Anita loves to be involved in pranks and all things comical.
I love that this "Anything Goes" non serious challenge falls on April Fool's Day! How fun is that? It was the perfect opportunity to make something using lots of humorous quotes and phrases. Several of Wendy Vecchi's new stamp sets from Stamper's Anonymous had the funniest sayings with perfect images to make a birthday journal card using Maya Road's Linen Mini Journal as the inside. The cover and journal are colored up using Tim Holtz Distress Paints by Ranger, and Tim's Mini Blueprints 4 provided perfect birthday images as well. I hope this makes the recipient as happy receiving it as I was making it.


Anna-Karin tries to come up with an April's Fool's Day joke every year and thought a gate folded pop-up card with surprises on the inside would be fun.
I set out to make a bright and funny card, but since we aren't having any rules this week, I just started gluing vintage papers down without much of a plan and the card ended up being grungy instead. I used Karen Burniston's super fun Circle & Ribbon Platform die to create the two pop-ups. The new Distress Paint dabbers are very fluid and perfect for washes, which unified the different background papers. I used a lot of Tim Holtz stamps and on the front there is a Picture Wheel and more stamping. The new Mini Filmstrip & Ticket die cuts such cute tickets, which were placed here and there. Laugh a lot today and create fun memories!


Sarah has been rather ill lately and one night when she was still awake at 4am she decided to find solace in her craft room.
I don't know if it was the medication or lack of sleep that caused me to think up this card but it was sure a lot more fun than lying awake coughing! When things don't go smoothly in life I can still manage to rustle up a little humour. I still hadn't inked up my Mr. Tim Ringmaster stamps and thought these tashes would look rather good "off the edge". Seeing as it's a no rules week, I figured I could get away with a kind of "Vintage meets Clean and Simple" card. A couple of ChitChat words start the invitation and Worn Text stamping on the inside finishes the ever so slightly silly inky fun.


Suzz  was inspired by the Jenni Bowlin Photo Album Clear Stamps to create her own mini-album.
I had a great time looking through my various stamps to find backgrounds and images to use on the pages of my mini-album.  I embellished the front with a sweet bird from the Studio Calico Birds.  I used the Ranger Acrylic Paint Dabber - Snow Cap to give the bird a coat of paint and added a hint of plum using the Memento Sweet Plum Ink.  The pages use a variety of quotes and images with fun embellishments.

 
For more inspiration click on our design team's blog links so you can see more photos (and full supply lists) for their projects. Remember, this week ANYTHING GOES you you can run wild and create anything you desire.
 
As always, Simon Says Stamp is giving away a $50 gift voucher that will go to a random entry chosen by Random Generator. To qualify all you need to do is create a new project and post it, along with a link back to this challenge, and add a link here. This challenge will end at 11:59pm on Sunday April 7th  EST.

For the full rules, read the "challenge rules" posted in the side-bar here on our blog.