Monday, July 30, 2012

Challenge: What do you say?

What do you say?   Sentiment stamps and stickers are my most forgotten asset in my stamping arsenal. Either I forget to use them, never find the perfect project, or otherwise just don't get them used up. No more! Today's challenge "what do you say?" encourages you to use a sentiment in some way.
You could talk about something, create with a sentiment stamp, share your favorite quote on an art journal page, even create a scrapbook layout filled with your thoughts on something special to you. The ways to interpret the challenge are wide open. We just want to know... what do you say?


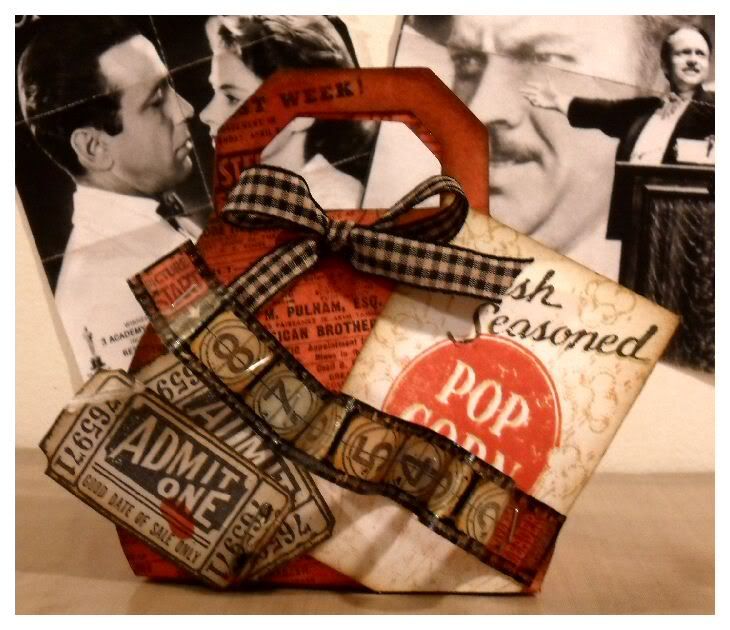
Sarah Engels-Greer created two vintage-inspired cards steeped in memories from yesteryear...
I always think that old photographs and sentiments go hand in hand! There's just something about vintage photos and their untold stories that gets me every time! I created two travel themed cards using Tim's fabulous Destinations Paper Stash, Walnut Stain Ink and two stamped sentiments from the Attic Treasures set which fitted just perfectly on my mini-tags.


The perfect sentiment for Tracy Evans this week was from the Huck Finn plate by Artistic Outpost, a great starting point for her sailing piece.
I love this sentiment, it's something that has been said to me many times in my life and it seemed the perfect time to use it and works perfectly for me in this piece. Lots of blended ink create my scene using faded jeans and weathered wood Distress Inks.


Candy Colwell's sentiment encouraging individualism inspired her tag;  reminiscent of the explosive 60s and psychedelic 70s. 
I live by this sentiment; whether it be in my personal life or my art.  And because I feel so strongly about this sentiment, I really wanted to create something that screams "Be Different".  I used some bright and fun Dylusions Sprays and Stamps to create the basic design.  Then for a major POP of color and shimmer, I added Stickles to the flowers.  I love Stickles for that "WOW" factor!


Terry was feeling like making an ATC and while she was sitting at the table all her ideas came out in crackle, distress stains and words.
I was in a loving mood so I decided to use these fabby stamps from Tim Holtz.The background is worked on with lots of yummie distress stains, paint dabber and crackle. The birds are embossed with copper embossing powder to give them such an effect, like they are breakable, like everything in life is. The sentiments are from the Chitchat stickers and work really well with the birds, don't you think? In life everything flies by and goes fast like in the movies.


Ashli 
was inspired by the simple sentiment of "Love" to create a sweet canvas that will hang in the room that her daughters share.
I love the versatility of the word "love" and it is the feeling I most want my kids to receive from me. So, when I saw Ali Edward's SMOOCH stamp set, I just knew I had to have it! After priming a salvaged canvas with gesso and collaging on some patterned paper, the simple handwritten words became a perfect textural background when stamped repeatedly in Archival Black. The gorgeous colors in Basic Grey's What's Up collection dress up this sentiment and add a fun touch of whimsy that is perfect for any girl's room!


This week Suzz created a shabby chic piece that will be perfect for displaying in her home.
I am an avid reader and loved reading Emily Dickinson growing up. The lovely quote from Artistic Outpost Quote and Quotables is one of my favorites. The bird from the Crafty Secrets Clear Fairyland set seemed like the perfect image with the poetry.  I created a perch using the 7 Gypsies Tryptich Arc Window.  I also added texture using the 7 Gypsies Gaffer Tape, Claudine Hellmuth Gesso, and Baking Soda. This arch will fit perfectly on an easel on my desk.


If she gets the chance, Sandra Mouwen dreams all day long. This is what she dreamed up this week.
"Don't dream your life, live your dream" is such a true sentiment. I'm a bit of dreamer. One of my biggest dream is to go to the USA one day. But first I'm going to Paris next week! One dream at a time. For this card I did the reflections stamping technique using the Remnants Stamp set and  Distressed Frame Embossing Folder.  I made a mask out of an old packaging by stamping the hot air balloon with Archival Jet Black and cut it out with Craft Scissors. I used the positive to color in the background and used the negative to color in the hot air balloon and spray it with some Perfect Pearl Mist Biscotti.


I (May) fall in love with stickers with sentiments, but never use them. This must change- starting with this card.  
I am a doily loving girl, and one of my favorite tricks is to grunge it up with some distress ink to add color to an otherwise cheap and plain white doily. With a bit of ink and some stitching all I needed to add was a bit of Basic Grey's new Paper Cottage collection  and a go-to card design. One of my favorite products from the Paper Cottage line is the layered cardstock stickers that just beg to be used and mailed to someone special. Now I need to get back to using up some sentiment stickers and getting cards mailed out to loved ones.


Anna-Karin made the sentiment the centre of the world on this dimensional card:
I rarely let sentiments take centre stage on a card, so this was a fun challenge for me. After deciding to use this great sentiment from Artistic Outpost, I thought it would go well together with the Vintage Globe die, and some gears turning the globe around. The globe was die-cut from grungeboard and watercolour paper, and the circle part was watercoloured with Distress Inks. To really showcase the sentiment I stamped it on one of my favorite products, clear modeling film, and shaped it into a rough globe shape, adding a little wood veneer bird on top.


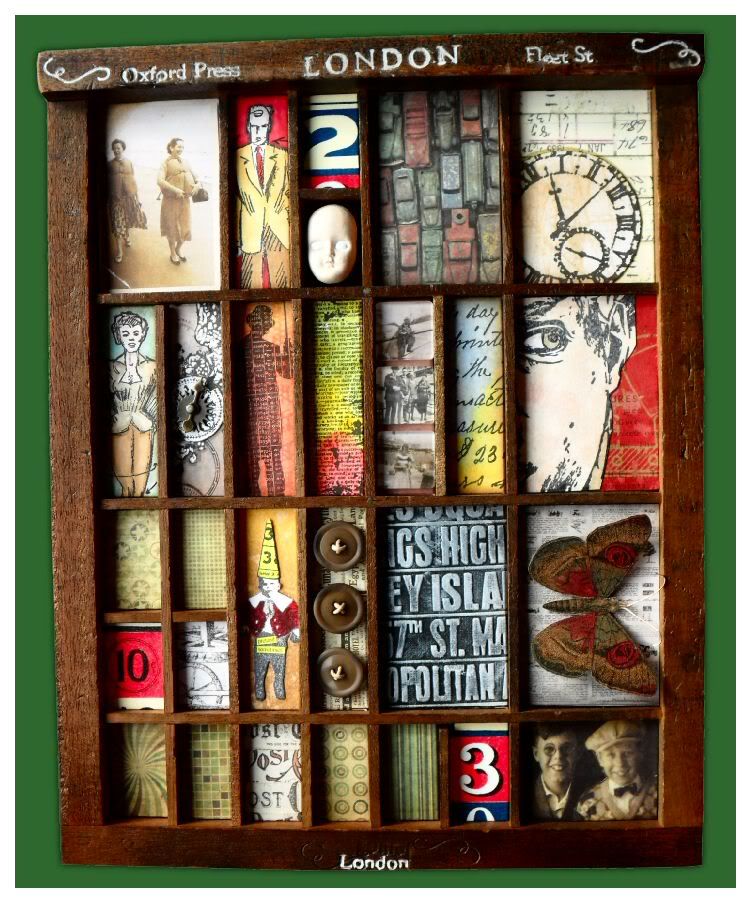
When it came to project time, Dan began to write in rhyme...
Although this challenge is themed around sentiments, right from the get-go I couldn't get the title, "What do you say?" out of my head.  After mulling over it for a while I wrote a little morality tale in poem form.  There are four verses, it seemed to make sense to show you the first one.  Among the products I used were the Tattered Time card stack, the It's Face Art, World Traveler and School Desk stamp sets and a range of Distress ink pads.


Dan shares more of his book pages on his blog, and in fact I encourage you to check out each of the design team member's blogs for more photos, supply lists, and more. Simply click on their name (above the photo of their project) to visit their blog.

Now that we've shared their creations - we're ready to see yours! As always, Simon Says Stamp is once again giving away a $50 gift voucher that will go to a random entry chosen by Random Generator. The challenge will close at Midnight Eastern time on Sunday, August 5 and the winner will be announced during the following week. To qualify all you need to do is create a new project that ties in with our theme and post it to your blog, then add a link here.
For the full rules, read the "challenge rules" posted in the side-bar here on our blog. We can't wait to see what you make.


Friday, July 27, 2012

"No rules" winners:

Keep those "hey girl" entries coming for this week's challenge - we're loving what you came up with and all the variety of projects that we are seeing!


Right now I'm excited to announce the winners of the No Rules Challenge.  This week was our biggest turn out yet - we loved seeing all of your creations. So inspiring! First up, we have randomly drawn the winner for the $50.00 Simon Says Stamp Gift Voucher and that goes to...

219 Kim S

Congratulations! Please claim your prize within the next two weeks by emailing May with your details.
Now for the top 3. Each week the Design Team nominates their favorites and the three entries with the most votes get a fabulous blog blinkie! Gotta love those bragging rights. The winners that have been selected are...


59 Micki
61 Kelly
388 SannaS


Be sure to visit their blogs and check out their amazing entries. So inspiring! Congratulations to each of you on a challenge well done! Please email May for the Top 3 Blinkie. 

I'd like to thank everyone who took part in the challenge. It is always a joy to see what you create. I'd also like to say thank you to Simon Says Stamp for their generosity - each week we give away a $50 gift voucher to the shop that you can use to buy all kinds of fabulous stamps, inks, and paper crafting supplies. Remember - you just need to enter the challenge each week to be entered into the drawing!

Monday, July 23, 2012

challenge: Hey Girl

Whether you want to invite some friends to tea, create a card for your favorite aunt, an art journal page inspired by one of your favorite women in history, a piece of jewelry, or a project that simply has a feminine feel to it, this week is all about ladies. Of course feminine inspiration doesn’t have to mean pink and flowers - you could use Wonder Woman, a classic movie star, or your favorite lady writer or musician as inspiration too. 
Let's see how the design team interpreted this challenge:

Terry went for a shabby vintage look with her feminine tag this week.
I sat down at my table and it just popped into my head what I wanted to make. I started out with  Distress inks to give the Tag lots of color, and at the bottom of the Tag I played around with Metal Foil. The rose was made with Grungeboard and die from Tim Holtz. Lots of blue and orange distress inks and Crackle Accents too. I always think that if you BELIEVE in YOURSELF you can create anything, and the Chitchat stickers helped me express my sentiments on this piece.  


Dan took a trip back to the golden age of Hollywood for this movie-themed purse.
Ok, let me start straight out by saying that girl-themed things aren't exactly in my wheelhouse, but what could be more girly than a purse, right?  The trickiest part of this project was the popcorn container, which I stamped 3 times in different colours to achieve this effect.  Among the products I used were the At The Movies stamp set, Fired Brick Distress Stain, film-strip ribbon and the Tiny Attacher.  Of course, once I'd attached the film-strip ribbon, the..... oops, the movie's starting, someone pass the red vines!


Sarah Engels-Greer was in the mood for drama and a compendium of circles!
I dived into a rich mix of funky, bright inks combined with dramatic black to create my alternative triple hinged card! I wanted to try out Ranger's Specialty Stamping Paper which is fabulous. I adore this damsel from Wendy's Art Rules Stamps, and thought she would look right at home with Dylusions Sprays and Jet Black Archival ink.


Tracy Evans decided to use the Winged Things 1 for her grungy feminine piece this week, adding lots of texture and interest.
I love this young feminine image, I find it so dreamy and perfect for the ladies in our life, young or old.  I love adding lots of texture and interest to my pieces including a dimensional flower cut using the Spellbinders Spiral Blossom One die. I added further interest in the background with a little stamping using the Mixed Media stamp set.


Candy Colwell loves the shabby chic style. She had a little wooden chest that she wanted to use for storing her favorite laces and little charms but just never was inspired to finish it until she saw  Pink Paislee's London Market Collection.
When I saw those luscious London Market pieces, I knew I had to create this chest!  All of the distressing is done with various Tim Holtz Distress Inks.  I also love dimensional, interactive pieces so this shabby chic chest is dripping with beautiful ephemera and Tim Holtz Ideaology pieces with some 7 Gypsies Antique Brass elements added as well.


Inspired by an upcoming trip to Paris, Sandra Mouwen takes us to the Moulin Rouge with her tag.
Paris is one of my favorite cities in the world, and as I'm planning this trip, creative ideas are flying around in my head. I had some scrap metallic gift wrapping laying around that I wanted to use for this project, and I made a big mess by coloring it with jet black Archival ink and creating the pattern using my fingernails. It's always fun to dress up Tim Holtz' dress form! To get the bright rich red background color and let it pop, I've used two different kinds of red, Barn Door and Fired Brick Distress ink and finished the edges with Black Soot.


With 3 girls at home, Ashli Oliver is no stranger to all things girlie! 
This layout turned out nothing like I had it in my head. Actually, that often is the case for me! Inspired by the photo and the combination of colors in the Snow White dress, I decided to bring in these colors in a soft and feminine way through the use of watercolor paintAfter some fun artistic play with paint and paper, I cut out a heap of flowers using my Tim Holtz Tattered Florals Die. I think the colors in the American Crafts Shoreline collection provide a much needed contrast for my watercolor flowers. Some finishing touches of black with Heidi Swapp's Color Magic BannersAmy Tangerine stamps and Studio Calico Arrows provided the perfect punch.


What could be more girl inspired than sisters? That’s the direction Suzz took her card this week with a walk down memory lane.
These sweet sisters are adorable in their party frocks in this Artistic Outpost Birds of a Feather stamp. They remind me of when my older sister and I were little and my mom would put us in matching dresses. The background is stamped using the Hero Arts Cling - Classic Fabric Design to create an elegant pattern. To add even more of a feminine touch I dyed some Maya Road Organza trim using a combination of Tattered Angels Glimmer Mist Silver Sugar and Tattered Angels Glimmer Mist Pure Violet and sprinkled pearls all around.


Anna-Karin created a canvas about her grandmother, using a rich teal, brown and gold color scheme and many meaningful little details.
This turned out to be one of my all-time favorite projects, since it represents my memories of my grandmother very well. She wore stylish clothing, created artsy ceramic pieces and loved dogs and birds. The background was painted, stamped, and splattered with paint. Fragments form the main embellishments and were inked with alcohol ink and glued to patterned papers and stamped images. The Mini Sewing Room dress form was die-cut from grungeboard and covered with layers of UTEE, finishing off with two layers of Stream embossing powder and a bit of gold powder, to create a faux-ceramic look.


To see more photos and detail of any of the design team member's creations, simply click on their name (above the photo of their project) to visit their blog.

Now that we've shared their creations - we're ready to see yours! As always, Simon Says Stamp is once again giving away a $50 gift voucher that will go to a random entry chosen by Random Generator. The challenge will close at Midnight Eastern time on Sunday, July 29 and the winner will be announced during the following week. To qualify all you need to do is create a new project that ties in with our theme and post it to your blog, then add a direct link to that project post here.
For the full rules, read the "challenge rules" posted in the side-bar here on our blog. We can't wait to see what you make.


Thursday, July 19, 2012

Challenge winners: Layered

Keep those "no rules" entries coming for this week's challenge - we're loving what you came up with and all the variety of projects that we are seeing!


Right now I'm excited to announce the winners of the Layered Challenge.  This week blew us all away. You're so inspiring! First up, we have randomly drawn the winner for the $50.00 Simon Says Stamp Gift Voucher and that goes to...

106  Cathy R

Congratulations! Please claim your prize within the next two weeks by emailing May with your details.


Now for the top 3. Each week the Design Team nominates their favorites and the three entries with the most votes get a fabulous blog blinkie! Gotta love those bragging rights. The winners that have been selected are...


3 Debbie R, 17 Gillian, and 169 Coconut


Be sure to visit their blogs and check out their amazing entries. So inspiring! Congratulations to each of you on a challenge well done! Please email May for the Top 3 Blinkie. 

I'd like to thank everyone who took part in the challenge. It is always a joy to see what you create. I'd also like to say thank you to Simon Says Stamp for their generosity - each week we give away a $50 gift voucher to the shop that you can use to buy all kinds of fabulous stamps, inks, and paper crafting supplies. Remember - you just need to enter the challenge each week to be entered into the draw!

Monday, July 16, 2012

Challenge: No Rules!

When it comes to crafting I have one rule: have fun. So it seems fitting that this is a “no rules” week here on the challenge blog. If you’re a regular here, then you know what the drill is this week: anything goes. What does that mean? You’re welcome to create any craft project you like - in any style, medium, or color and with any products or techniques. You’re welcome to get inspiration from a favorite crafter, make something that you’ve been meaning to do for a while, or just make some happy creative play time.
 
Looking for inspiration? Check out what the design team has made this week:

Sandra Mouwen likes to mix things up and get funky, and she really shows that off here on this folded card.
When I saw this lunchbag in a corner of my craftroom, I immediately knew that I wanted to make it into a folded card. I was in the mood for some funk, and as it's a birthday card for a male colleague of mine, I really wanted to give a masculine edge to it. I challenged myself to use funky bright colors like Peacock Feathers, Mustard Seed, Tumbled Glass, Crushed Olive Distress ink and stamped the background with the Mixed Media Stamp set of Tim Holtz. Now I had to achieve the steampunk feel, so I used some spocket gears with a game spinner and the Steampunk on the edge die.


Tracy Evans created 3 vintage ATC's this week cut using the ATC & Corners die from Manila Card stock and decorated with vintage corset images, ageing with vintage photo Distress Ink.
This was one of my favourites as I love the vintage images and the fabulous dimension. I loved adding into the mix vintage Lace Trim and buttons to add to the vintage feel along with letters added to Jump Rings for added interest. I love creating ATC's they are wonderful small pieces of art but can add a BIG impact.


Anna-Karin created a little bag holding a tag, embellished with rolled paper roses, die-cuts and stamping.
When doing cards or tags with bulky elements, I often wonder how to present them to the receiver, since they don’t fit into ordinary envelopes. Looking at the In The Bag die, I realized that the little bag would be a fun way of handing over a bulky tag. The bag and tag were die-cut from manila cardstock, inked and stamped with flowertext and flourish stamps. A bit of dry embossing, grungeboard die-cuts painted silver and one of my favorite sentiments finished off the project.


Sarah Engels-Greer created a summer sanctuary for her flowers, whimsical house and butterflies.
Anything goes was my chance to have an Arts Parts Party and dive into my Wendy Vecchi goodies. I love to lay all the Art Parts out in front of me and let the different shapes inspire my piece... I love thinking, designing and creating in three dimensions. I used two Artful Shrine Frames along with a fabulous combination of Distress Stains and Dylusions Sprays to create a house full of summer colour!


Suzz created a set of vintage place card holders for a family gathering.
I decided to create a unique place card holder for each guest using a set of wooden spoons that I have been hoarding. To color the spoons I immediately thought of using the Ranger Distress Stains. The stains work perfectly on the wood surface to create an even coat of color. To soften the effect of the colors I followed up with a smudge of Ranger Adirondack Paint Dabber - Snow Cap. I selected images from the various Artistic Outpost plates: Kudzu Kafe, Paris Exposition and Bluebird and decorated them to fit my guest's personality. The Memo Pins Split Ring work as the perfect clip to hold my name tags.


Candy Colwell created a vintage album full of pockets, pullouts, inserts and flipouts.  
This album will proudly be home to my grand children's school photographs and memorabilia. The basic album was created from Kraft Cardstock and then covered with those fabulous Graphic 45 ABC Primer papers.  All gluing was done with 1/4" Scor Tape and distressing courtesy of Gathered Twig and Black Soot Distress Inks.

Give Ashli Oliver no rules and she runs wild! Instead of choosing a layout or a tag, she's combining the two.
I love thinking outside of the box when I scrapbook and since I had no rules this week, I did just that! First, I stamped the Ranger Craft Tags with white acrylic paint using the Hero Arts Chevron Stamp. This is super fun as the paint acts as a resist when mists are layered over it. spritzed and sprayed a bit of Distress, Maya Mist and Mister Huey's and wiped away the excess with a baby wipe. I love the ocean-like effect this gives to play off of the photo of my girls drawing in the sand.


Dan had the marathon task of creating 28 separate panels for his piece this week.
I was lucky enough to be given this vintage printer's tray as a gift, but a similar effect can be achieved with the Tim Holtz printer's tray.  This was a much bigger job than I realised when I started it, it took medicinal doses of chocolate to get me through to the end!  I got a chance to use Tim's Subway embossing folder for the first time, sponging it with Claudine's white paint to highlight the text.  In addition to the stamped panels I used sections from the Lost and Found, Destinations, Retro Grunge and Kraft Resist paper stacks.  All I need to do now is collapse in front of the tv.


Terry created a baby book to go with the baby card that she already made for her fellow design team member Sarah. 
I wanted to make something special for Sarah so I had to wait until she gave birth to her baby. Now that I know that she has a beautiful baby girl; I altered a notebook and made a girly baby book. I used the Graphic45 Little Darlings paper to decorate the book because the papers tell me how wonderful new life is I just love them. To give it even more a vintage feeling I distressed the edges with Vintage Photo, and I used Tim Holtz Chit Chat Stickers on the cover as well. I could not resist using some crackle accents. I placed some on the 'mother' and at the bottom of the book, so this way you can see how fragile everything around us is and that you should treasure the little ones.


Finally, it is my turn to share. I (May Flaum) was absolutely giddy to have this no rules week to run wild. So, stepping a bit outside my usual creative zone I've created a canvas using a piece of coloring book paper.
I've been wishing there was some way to do some kind of Disney inspired home decor project on my own with my craft stash. So I got that coloring book out and selected my image and got to work! I did an image transfer technique with Claduine Hellmuth multi medium in matte onto a canvas. Once that was set and the paper removed I ran completely wild with paints, brushes, stains, and so much more. I had an absolute blast - and I will definitely be doing more of these in the future.


I have a video how-to of my technique up on my blog, and in fact I recommend you make sure to check out each of our design team member's blogs to see more photos, supply lists, and details about their projects this week. Simply click on their name (above the photo of their project) to visit their blog. I do so love reading their blogs each week - so much inspiration.

Now that we've shared their creations - we're ready to see yours! Simon Says Stamp is once again giving away a $50 gift voucher that will go to a random entry chosen by Random Generator. The challenge will close at Midnight Eastern time on Sunday, July 22 and the winner will be announced during the following week. To qualify all you need to do is create a project that ties in with our theme and post it to your blog, then add a link here.
For the full rules, read the "challenge rules" posted in the side-bar here on our blog. We can't wait to see what you make!


Thursday, July 12, 2012

Spritz, Spray, or Stencil challenge winners

Keep those layered challenge entries coming for this week - we're loving what you came up with!


Right now I'm excited to announce the winners of the Spritz, Spray, or Stencil challenge. Your entries were all incredible and so inspiring. First up, we have randomly drawn the winner for the $50.00 Simon Says Stamp Gift Voucher and that goes to...

3 izzwizz

Congratulations! Please claim your prize within the next two weeks by emailing May with your details.

Now for the top 3. Each week the Design Team nominates their favorites and the three entries with the most votes get a fabulous blog blinkie! Gotta love those bragging rights. The winners that have been selected are...


46 inkypinkycraft, 66 Polly and 45 kate

Be sure to visit their blogs and check out their amazing entries. So inspiring! Congratulations to each of you on a challenge well done! Please email May and she will send you the Top 3 Blinkie. 

I'd like to thank everyone who took part in the challenge. It is always a joy to see what you create. I'd also like to say thank you to Simon Says Stamp for their generosity - each week we give away a $50 gift voucher to the shop that you can use to buy all kinds of fabulous stamps, inks, and paper crafting supplies. Remember - you just need to enter the challenge each week to be entered into the draw!

Monday, July 9, 2012

Challenge: Layered

Whether you decide to layer papers, colors of mist, or perhaps if you get more philosophical and layer meanings in your project, that is the challenge this week. Create a project with layers. The topic really needs no further explanation, so let's jump right in and see what the design team has come up with this week:

Sarah Engels-Greer is not a scrapbooker, but she challenged herself to fill a 12 x 12 piece of Tim's Paper Stash.
She started by creating a tag with Tim's Kraft Glassine Paper stamped with the little girl. Then she added lots of shabby layers, Tattered Floral flowers, touches of Papillon butterflies and rusted Idea-ology.

Tracy Evans added lots of layers this week onto her industrial floral card.
She used  Metal Foil Tape fabulous dimensional flower created from the Tattered Florals die, rusty wire, corrugated card and embellishments galore.


Candy Colwell's creation began as a little paper bag cut from Tim Holtz In The Bag die cut and his Kraft Resist Paper Stash
Instead of layering things, she layered Distress Inks, Blue Patina Perfect Pearls Mist, multiple Tim Holtz Stamps and some really cool Tea Stained Mica Fragments.  She even managed to sneak in a metal Mini Gear!


Dan was inspired to create this piece of home decor by two wildly different emotions.
"This week's piece is one of my more personal entries, being inspired by a song that has meant a lot to me through the years.  I created shadow chambers from black card that sit on a layer behind the doors I cut in the chests of the Brothers Karamazov (no reason for calling them that, it just trips off the tongue nicely).  I used pieces from the Destinations and Retro Grunge paper stacks, along with Distress Inks and Promarkers to colour the main figures."


Terry created a frame with lots of butterflies.
"I wanted to see what I could do with Metal  Foil, so I used the Ranger foil sheets in various ways to create a framed décor piece. First I embossed the foil with  Springtime Texture Fades. To give the metal surface an aged feel I worked some alcohol inks and then black acrylic paint onto the embossed area. I layered not only foil on this project, but flowers cut from the Spiral Blossom die, lots of Mini Butterflies from Tim Holtz  and crackle paint, ink, and other elements."

To see more photos and detail of any of the design team member's creations, simply click on their name (above the photo of their project) to visit their blog.

Now that we've shared their creations - we're ready to see yours! As always, Simon Says Stamp is once again giving away a $50 gift voucher that will go to a random entry chosen by Random Generator. The challenge will close at Midnight Eastern time on Sunday, July 15 and the winner will be announced during the following week. To qualify all you need to do is create a new piece of work that ties in with our theme and post it to your blog, then add a link here.

For the full rules, read the "challenge rules" posted in the side-bar here on our blog. We can't wait to see what you make.